- About Pims
- General
- User Interface: Web
- User Interface: Win
- Administration Tools
- Procedures
- Completion Management
- General
- Setup and Configuration
- Engineering
- Field Inspection with Mobile Apps
- Project Overview
- Handovers
- Commissioning
- Scanning
- Documents and Drawings
- Windows Client
- Reference Materials
- Document Control
- General
- Managing Documents
- Accessing/Searching for Documents
- Subscribing to a Document
- Creating New Documents
- Creating Missing Document as Contractor
- Creating New Document Revision
- Reserving Revisions
- Document Profiles
- Creating native files PDF rendition
- Adding Cover Page
- Uploading New Revisions as Contractor
- Initiating Internal Collaboration
- Initiating a Document Approval
- Editing a Document Approval
- Deleting, Voiding, Superseding a Document
- Moving Document Data Between Profiles
- Checking up on Documents' Status
- Distributing Documents for Information
- Distributing Documents Using Trays
- Sending Document Reminders
- Exporting Documents as Importable Datasheets
- Offline Archives
- Importing an MDR
- Modifying Import Data
- Processing Documents Submitted by Contractors
- Distributing Documents (older version)
- Documents Import and Export (older version)
- Sharing Documents and Correspondence
- Managing Interface Documents
- Redlining Documents
- Managing Reviews
- Initiating a Document Review
- Editing Review
- Sending Review Reminders
- Adding Reviewers
- Removing Reviewers
- Performing a Review with PDF files
- Performing a Review non-PDF Files
- Performing a Review with SharePoint
- Consolidating Comments
- Returning Reviewed Documents to Contractors
- Viewing Review Comments as Contractor
- Responding to Review Comments as Contractor
- Managing Review Response Replies
- Tracking Review Status
- 3rd Party Verification
- Status of a 3rd Party Verification
- Managing Correspondence
- Operations Phase
- Understanding Asset Domain
- Understanding Site Modifications Domain
- Managing Site Modifications
- Adding Documents to Site Modification
- Handing over Documents to Operations
- Managing Conflicts in Site Modifications
- Managing Distribution Setup in Site Modifications
- Concurrent Engineering - Alternative Way of Handling Site Modifications
- Managing Certificates
- Setup and Configuration
- Setting up a Contract
- Managing Distribution Setup
- Importing Distribution Setup
- Inquiring Distribution Setup Input
- Managing Correspondence Distribution Templates
- Managing Documents Distribution Templates
- Setting up Distribution Groups
- Setting up Email Templates
- Setting up Offline Archives
- Setting up SharePoint Integration
- Setting up SharePoint filename template
- Setting up Document Cover Page Template
- Setup and Configuration
- Miscellaneous
- Cost Management
- General
- Project Control Basis
- Contracts Management
- Change Management
- Personnel
- Progress Measurement
- Interfaces
- Reporting
- Windows Client
- Workflows
- Quality Management
- General
- ITP Register
- Surveillance Register
- Activity Register
- Activity Details Management
- Activity Plan
- Checklist Register
- Finding Register
- Export, Import, Copy or Move Activity
- Program Register
- Configuration - Domain
- Configuration - Global
- Risk Management
- General
- Add New Risk
- Risk Register
- Risk Details Management
- Risk Assessments
- Actions Register
- Action Details Management
- Risk Plan
- Risks Dissemination
- Export, Import, Copy or Move Risks
- Risk Dashboard
- Configuration - Domain
- Import Setup
- Risks - Risk Breakdown Structure
- Risks - Inputs Labels
- Risks - Show/Hide Functionality
- Risks - New Risk
- Risks - Fields Setup
- Risks - Dropdown Values
- Risks - Multiple Choice
- Risks - Keywords
- Risks - Lifting Functionality
- Assessments - Configuration
- Assessments - Project Borders
- Actions - Show/Hide Functionality
- Domain Settings - Notifications
- Configuration - Global
- Configuration - Roles
- Desktop legacy user guides
- Reporting
- HSE Management
- Preparation & Execution System (PES)
- PES Release Notes
- About
- Administration
- Asset and Plant register
- Case Register
- Checklists
- Compliance Activities
- Compliance settings
- Contact Lookup
- Courses
- Currencies
- Default Colors
- Definitions and abbreviations
- Delivery Lines
- Disciplines
- Documents
- Locations
- Packages
- Position
- Position Settings
- Punch Items
- Statuses Overview
- Sub Systems
- Subsystem Handover Status
- Tag Register
- Tasks
- Work Breakdown Structure (WBS)
- Digital Procedures
- Handover
- Meetings
- Organization
- Personnel On Board (POB)
- Portal
- Progress & Trending
- Project Assurance
- Service Request
- Work Process
- Planning & Scheduling
- Material Management & Logistics
- About Material Management & Logistics
- Stock & Materials
- Procurement
- Warehouse & Packing
- Shipping & Logistics
- Rental Items
- Tool Request
- Settings
- Work Preparation & Work Order
- Work Preparation Request (WPR)
- Work Order (WO)
- Work Order Settings
- Work Orders - Settings Overview
- Work Order - Default Attachments
- Work Order - Types
- Work Order - Requirements
- Work Order - Checkpoints
- Work Order - Mhrs Type
- Work Order - Trades
- Work Order - Phases
- Work Order - Keywords
- Work Order - Hold Codes and Job Status
- Work Order - Factor sets
- Work Order - Settings
- Work Order - Norms
- Work Permit (WP)
- Livening Up & Down Notice (LUDN)
- Overtime Request Register (OTR)
- Query Management
- Query Managment - User Guide
- Workflow Modules
- General
- Setup and Configuration
- Controls
- Action Tracking
- Concessions / Deviation Requests
- Interface Management
- Management Of Change
- Technical Queries
- Lessons Learned
Interface Request user guide
Interface Request Workflow
The Interface Management System in PIMS is for process tracking the different interfaces for a project, agreeing the schedule for handover of data (technical) between two scopes of work, and providing a mechanism to advise this information in an efficient way.
Definitions and abbreviations
- Interface Request - A clear and timely request from a project stakeholder for unreleased technical data or information required to carry out their duty / responsibilities.
- A specific piece of work with an identified owner (SPOC) who is responsible for completing that scope of work.
- Single Point of Contact - Person from each scope who is responsible for managing interfaces within their scope.
- Company Single Point of Contact - Person From the master Company who is resposible for overseeing the scope.
- The Requesting Scope of a Request.
- The Responding Scope of a Request.
- Interface Manager - Person from the Master Company who is responsible for the Interface Management in the project (Can be set individually by Scope).
- Interface Management System.
- Project Information Management System – A Product of Omega PS.
- Person who initially raised/created the Request.
- Person assigned to Respond to the Request.
- Module process for completing the form.
| IR | |
| Scope | |
| SPOC | |
| Master SPOC | |
| Requesting Scope | |
| Responding Scope | |
| IM | |
| IMS | |
| Pims | |
| Originator (IR) | |
| Responder | |
| Workflow |
Accessing the system
To be able to view Interface Management Forms a user must either be an Admin or have access to Interface Management for the Project.
Permissions
- Global Admins can view all forms.
- Project Admin can view all forms.
- Scope Members can view forms if they are members of any of the involved scopes on that Project.
- Master Company users that has access to IMS on a project can view all forms on that project.
- Inherit Master Company Permission users can view all forms on projects they have access to IMS.
- Users can always view forms where they are nominated to sign regardless if they are still a member of the Scope.
- Users can only raise Interfaces from scopes that they are member of and to scopes that these are allowed to raise to. (see IM setup)
- Admins or Master Company users cannot raise forms unless they are added as a scope member.
Navigation
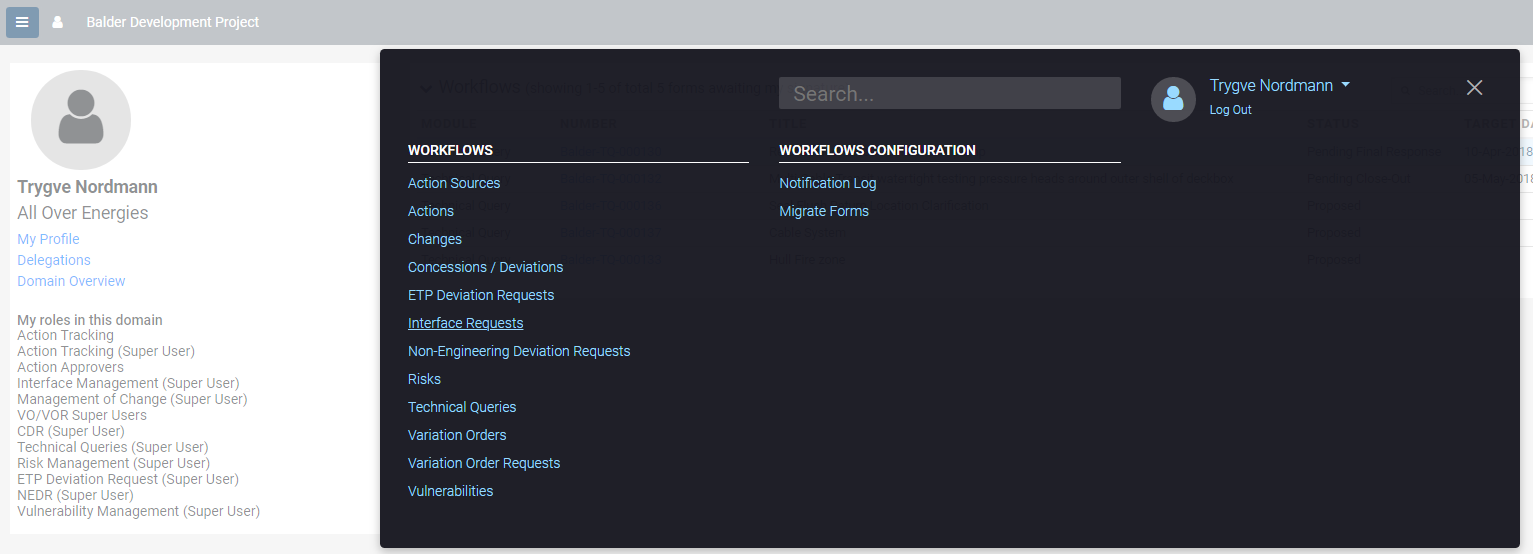
Interface Management is accessed from the Pims menu. Click the "Interface Requests" menu item, and you will be taken to the register. From the register you will have access to all regarding Interface Requests.
Common functionality
For information about common functionality please refer to the Common Functionality user guide.
Setup & Settings
Some settings allows each project to define individually. Admins can access this setting from the cogwheel menu item in the top right. Ref. Interface Management Setup user guide.
Note: When using the IMS settings admins must make sure that they are standing in the correct domain. The settings applied will only apply for the domain they are currently standing in.
Registers
For information about the general functionality of the register please refer to the Registers user guide.
New Interface Request
General
Clicking the "New Request" button from the Register will generate a popup for creating a new Interface Request. Select Project, insert title and requesting and responding scope. (see IM setup if scopes are not populated properly). Click the OK button when all fields have been filled.
Note : Depending on the settings for the project a SPOC needs to have been set as a minimum for each of the scopes used to be able to create requests. (see interface settings)

Workflow - Interface Request
Toolbar
The buttons that are available in the toolbar depends on the users access. For more information please refer to the Common Functionality user guide.
Header
The IR header displays general information of the Interface Request.

Header Data
- Title - Title of the form, this field can be edited
- Status- The current status of the form. All statuses are listed below.
- Proposed Form is Proposed and pending approval to be sent to responding scope. (initial status)
- Preliminary - Form is approved and pending Preliminary Information close-out.
- Final - Form is approved and pending Final Information close-out.
- Completed - Form has been completed.
- Rejected - Form has been Rejected by the Requesting SPOC and are no longer valid.
- Void - Form has been voided.
- Interface No - The number of the interface request.
- Revision - The revision of the form.
- Date Originated - The date the form was initially created (first revision).
- Date Submitted - The Date the request was submitted to responding side for review.
- Originating Person - The Person that created the form.
- Requesting Scope - The Requesting Scope of the IR.
- Responding Scope - The Responding Scope of the IR.
- Criticality - Criticality of the form can be changed by admins.
- Progress - Indicates the current active step(s) of the form.
Header edit Permissions
The following can change the title of the IR as long as the form is open.
- Interface Super User
- Requesting Person
- Requesting SPOC
- Project Admin
The following can change the criticality as the form is open.
- Interface Super User
- Requesting Interface Manager
- Requesting Master SPOC
- Project Admin
Section Headers
Each Section Header can be clicked to expand / collapse the section.
Unless otherwise stated, on the completion of each section, all information within each section will be locked down.
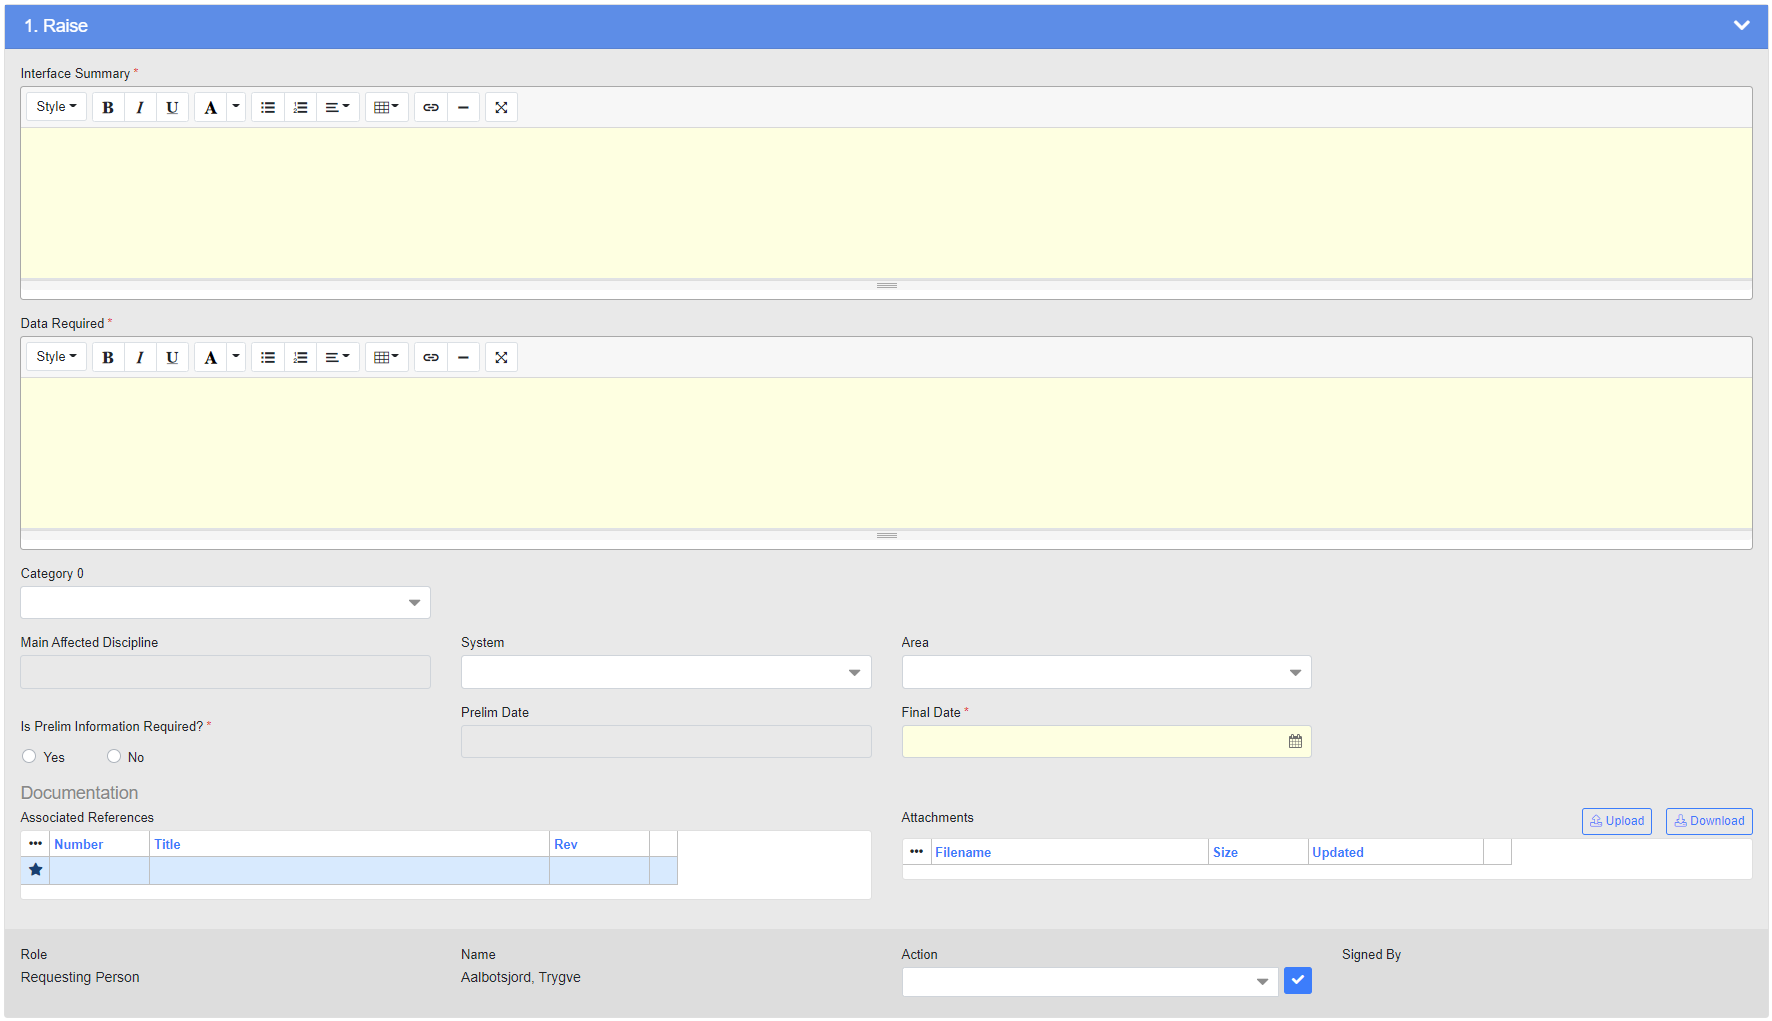
Section 1 - Raise
This Section captures the general information for an IR. The Requesting Person fills out the required information and submit it to the Requesting SPOC for approval.
Note 1 - It is advisable that when raising new IR’s, they should not contain requests for multiple pieces of information, this complicates the request and will result in delayed responses. As a guideline, an IR should only pertain to a single request for information. Therefore it is a good practice to split multifaceted requests into multiple IRs.
Note 2 – In instances where you need to request the same information for multiple Interface Points you can create a Multiple IP request by selecting the Multiple type and relate the requests to the required Interface Points. (you can only relate multiple request to points with the same discipline type and correspondence as itself)
- Interface Summary – Input a brief text summary that describes the interface and the purpose of the IR.
- Data Required – Include all the information which is required to close the IR.
- Category 0-4 - Categorization levels used can be adjusted/disabled by an Admin in settings. Hard IR type will not show any category levels.
- Is Prelim Information Required? - Select if the request requires a preliminary response or if a final response is required directly. If Preliminary information is not required preliminary sections (5,6) will be skipped.
- Preliminary Date – The date by which a preliminary response is due from the Responding Scope. Use the Date Picker control to choose a date. Dates cannot be set to historical ones, and final date must be the same of after the selected preliminary date. This date picker will be disabled unless Is Prelim Information Required is opted.
- Final Date – The date by which a final response is due from the Responding Scope. Use the Date Picker control to choose a date.
Note: Dates should be realistic and align with the Project Schedule
- Main Affected Discipline - Select the discipline of the request (Hard requests will automatically inherit the parent discipline from IP, thus cannot be edited)
- System - Select the system of the request
- Area - Select the area of the request
- Associated References - References to supporting documents can be added here. References can be typed directly in the grid by clicking "Click here to add a new row". References can be removed by clicking the row and the delete button on your keyboard. A prompt will appear to validate if you really want to delete the record.
- Attachments – Supporting documents can also be uploaded as attachments here by clicking the upload button and selecting the file to upload. Attachments can be removed by clicking the row and the delete button on your keyboard. A prompt will appear to validate if you really want to delete the record.
Signatures
- By Submitting in this section the system will progress the IR to Agree on the request details provided (Section 2)
- Choose the appropriate signing option from the drop down box, and then click on the button.
- Available sign options :
- Submit – This confirms that the Requesting Person has input all the required information to the best of their ability. Once selected and submitted the IR progresses to the Requesting SPOC for validation.
The following role(s) is nominated by default :
- Requesting Person (Person that created the form).
Section 2 - Agree
This Section is where the IR is validated by the requesting SPOC before sent to be reviewed for acceptance by the Responding SPOC, and Responder(s) are assigned. Additional persons can also be included to approve the Request if this is required.
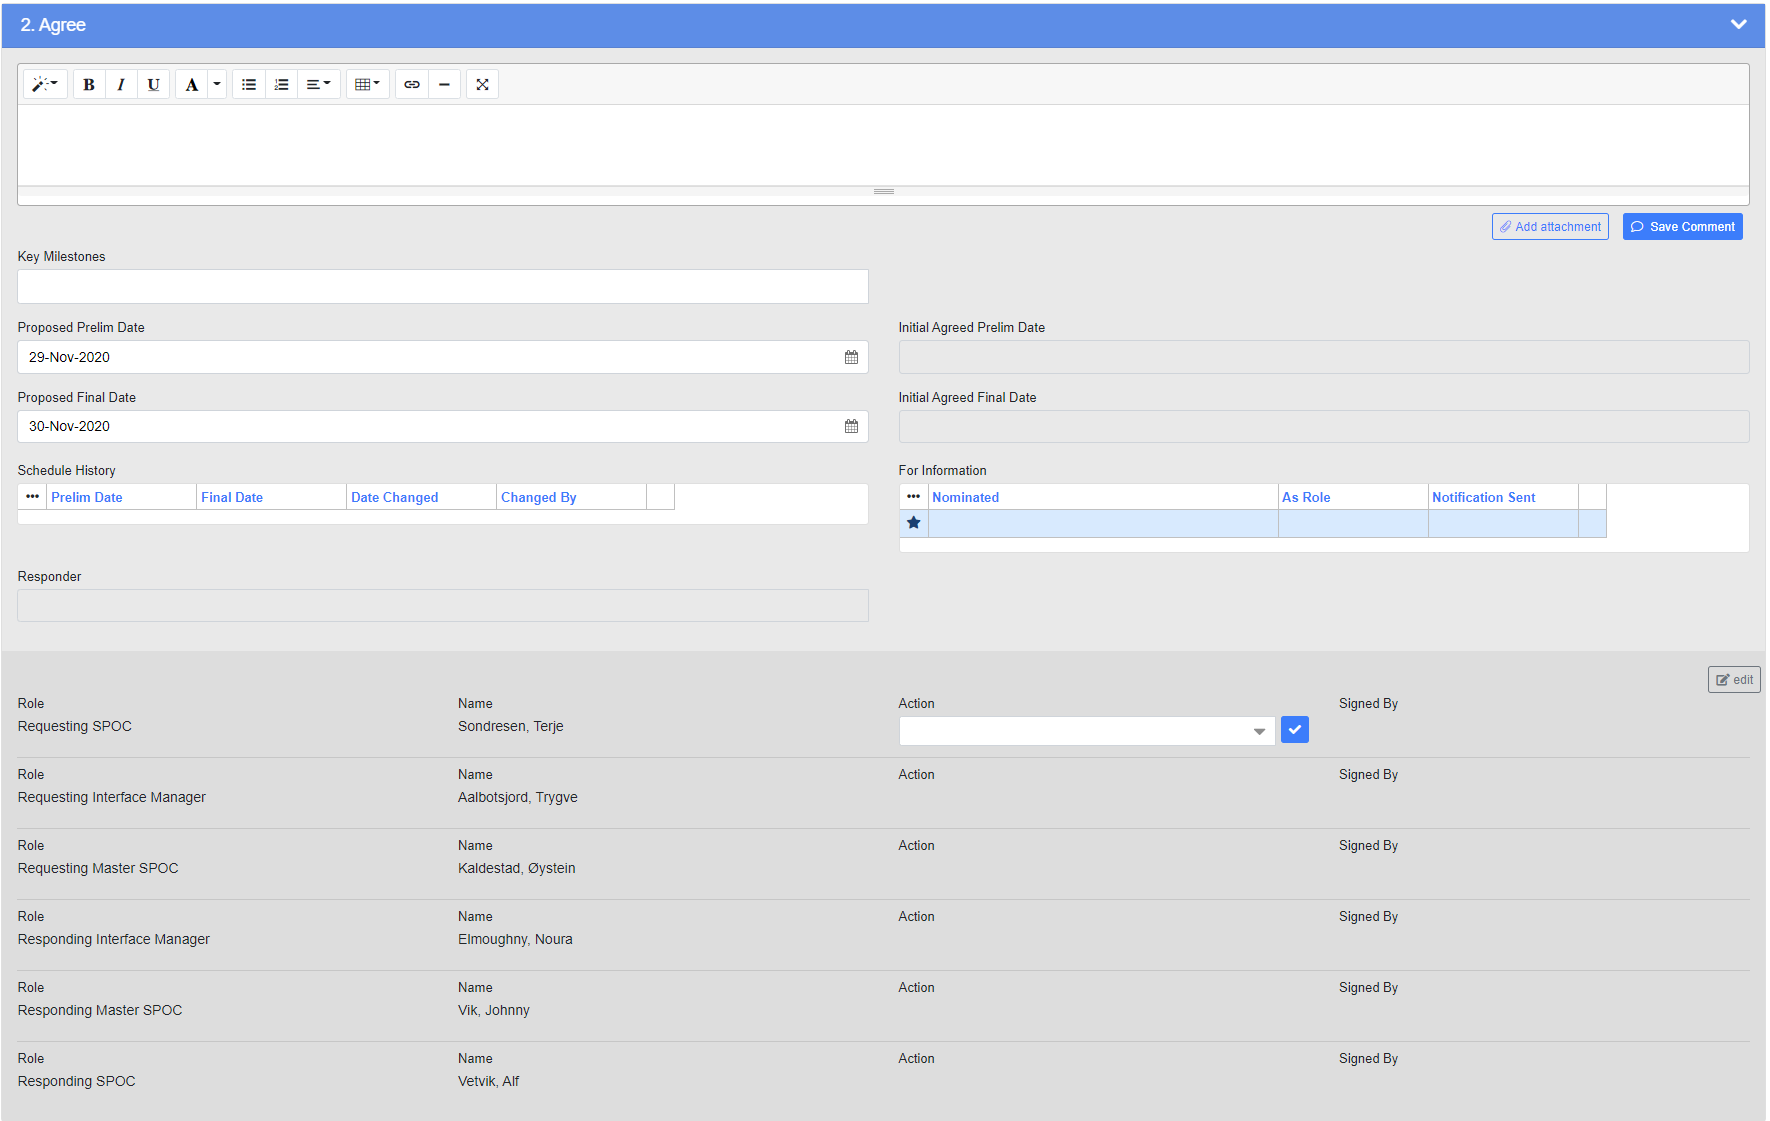
Additional Persons
- Optional: If the SPOCs requires additional persons to agree on the validity of the Request they can add one or more additional persons by clicking the edit button in the top right corner of the control(persons added will be included into section 2/5/7). The additional persons are required to sign off on the form before being able to proceed to next section.
- Added Persons can be removed by clicking the edit button again and using the x button next to the person.
Note: The system can only remove signatures that has not been signed.
Add Comment
- Optional : Users can add a comment to clarify information or to justify a sign action. In addition, any non-signing user that has access to the form can add comments.
Assign Responder(s)
- It is required that the Responding SPOC assign one responder before signing off in section 2.
Signatures
Completion of the required approvals in this section will progress the IR to receive preliminary information in Section 4: Input Preliminary Data or receive final information in Section 6 : Input Final Data depending on what the Is Prelim Information Required toggle is set to in Section 1.
Choose the appropriate signing option from the drop down box, and then click on the button.
Requesting SPOC - The Requesting SPOC must sign of first before the form is sent out to the others in section 2 for approval.
- Agreed - The Requesting SPOC confirms he is satisfied with the IR and it is acceptable to be submitted to responding scope for response.
- Recycle – The Requesting SPOC disagrees on the IR and recycles it back to section 1 for further details from requesting person. A comment must be inserted detailing the reason for recycling.
- Rejected (Requesting SPOC Only) – The Requesting SPOC does not approve the request as a valid request and rejects it from going to responding scope for a response. Form is locked down and status set to Rejected.
Others
- Approve/Endorsed/Agreed - Acceptance signatures to progress the workflow.
- Recycle – Recycling by other users nominated in section 2 will recycle the form back to Requesting SPOC for review.
The following role(s) is nominated by default
- Responding SPOC
- Requesting SPOC
- Responding Master SPOC (when in use)
- Requesting Master SPOC (when in use)
Section 3 - Re-Forecast Schedule
Section 3 is skipped by default but can be used by the SPOCs to negotiate a new Proposed Schedule if required. When the original dates agreed on in section 2 needs to be changed later on, this can be done by opening and using the section by clicking the Open button.
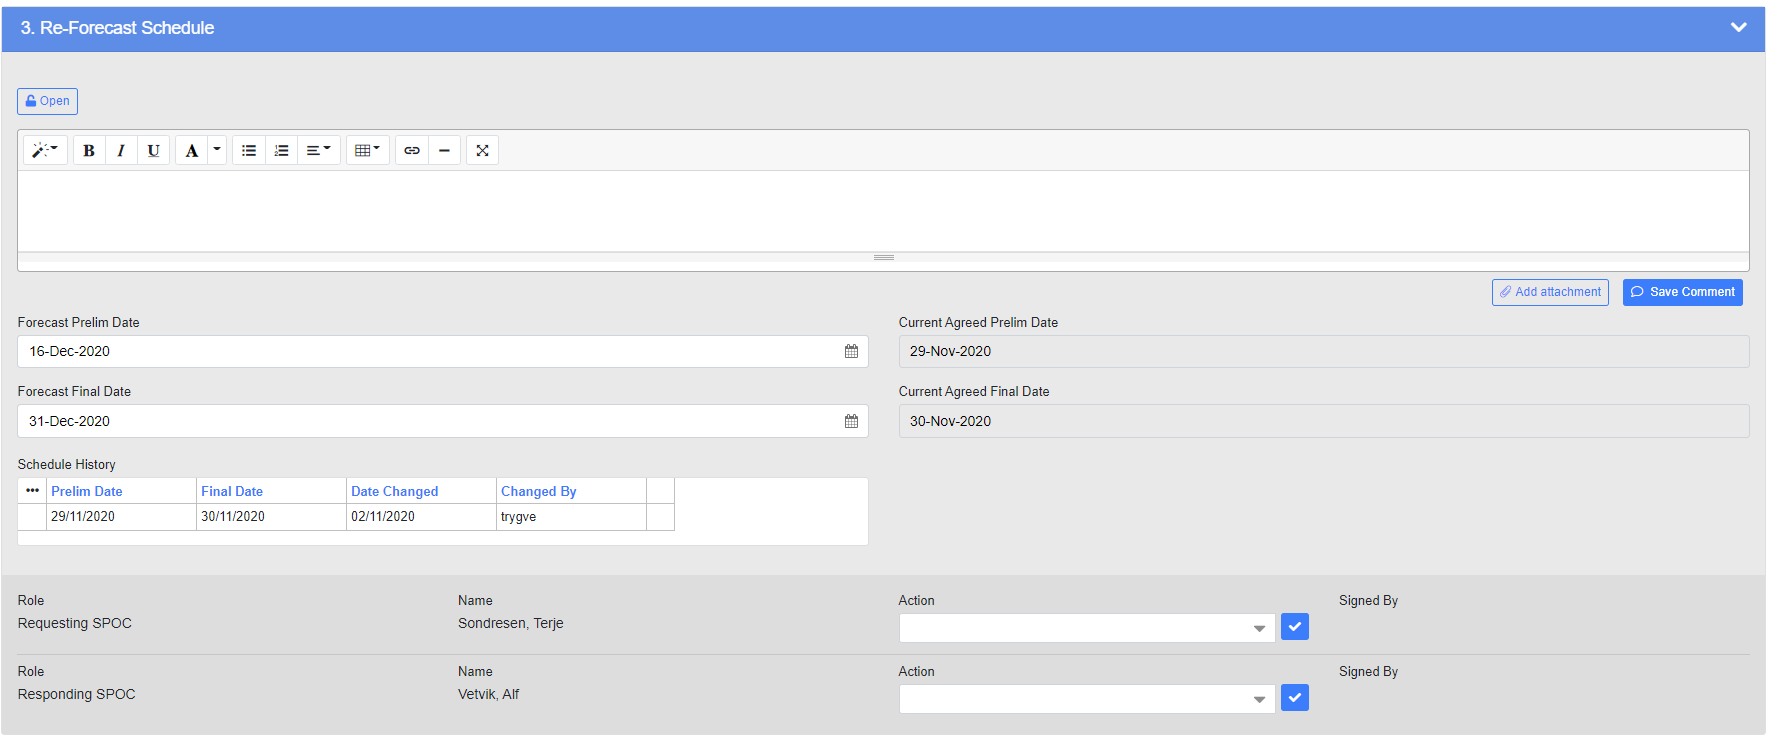 This Section is managed as a side process and does not prevent progress being made on the technical response or the form being completed.
- If you are proposing new dates it is requested that you add a comment to justify why you are proposing new dates before editing the dates.
- Proposed Schedule : Set the new revised dates of the proposed schedule.
- If the Requesting SPOC does not agree with the new dates proposed by the Responding SPOC he can change the dates, and propose those back to the Responding SPOC. This process can go back and forth as many times as required.
- When both SPOC’s has agreed on the new selected dates, Section 3 will lock down and the new dates submitted in Section 3 “Proposed Schedule” will become the new agreed dates.
It is the responsibility of the Requesting and Responding SPOC’s to agree a schedule of when the IR is to be closed by. The expectation is that the two scopes will work together to agree a schedule. It is not the intention that PIMS should be used for on-going change and does not replace the need for regular Interface Meetings, Calls, etc.
The IR module is not a tool for agreeing a change, it is simply a tool for requesting and providing information on already agreed scope within required time frames. If the information request is out of scope or dates cannot be met that result in a potential delay or scope change the Company SPOC (Master SPOC) should be notified immediately.
Signatures
Completing the required approvals in this section will set new target dates.
- Choose the appropriate signing option from the drop down box, and then click on the button.
- The signing options are as follows:
- Agreed - The user is confirming that the dates proposed by the other SPOC are satisfactory.
- It is advisable to discuss the matter with the other SPOC first to speed up the process.
The following role(s) is default nominated in Section 3.
- Responding SPOC
- Requesting SPOC
Section 4 - Provide Preliminary Response
On completion of Section 2 the first nominated Responder to respond will be notified by email they need to go into PIMS to provide a response
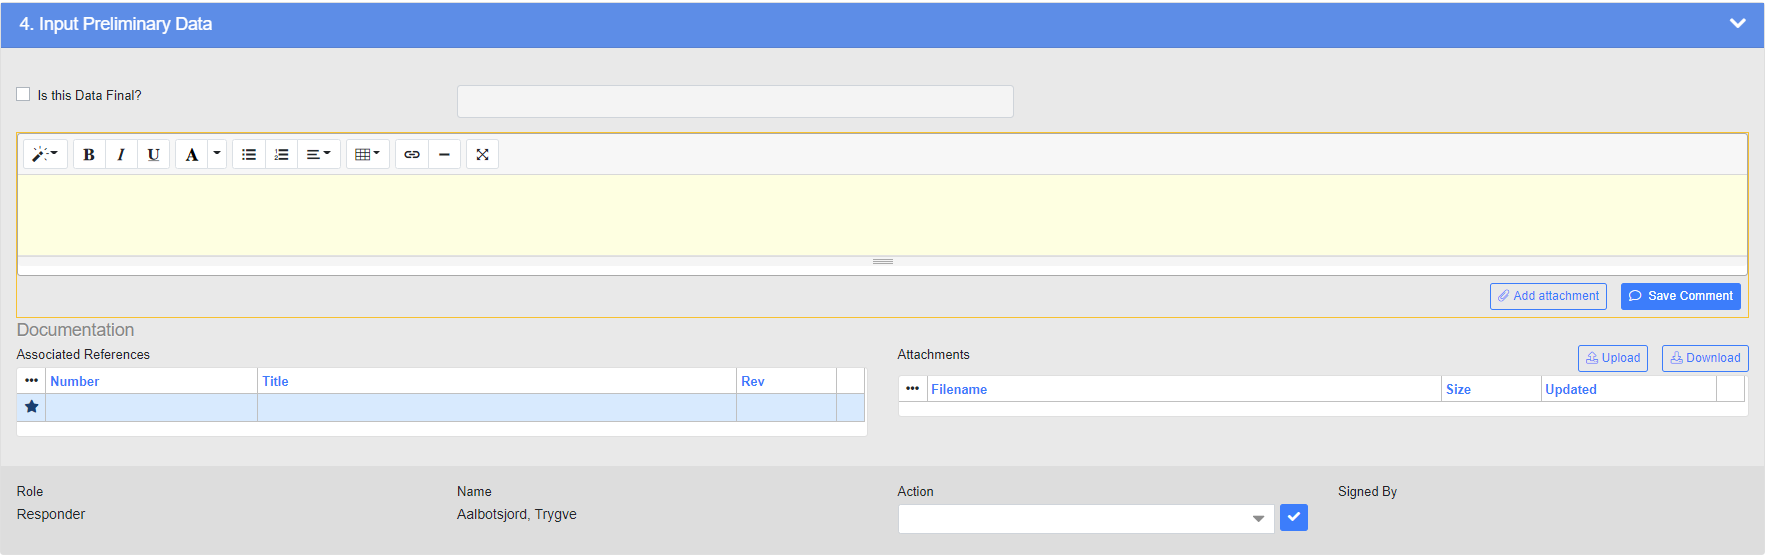
Is this Data Final?
- Checked – If you check this box, you will receive the below pop up to confirm if you wish to proceed directly to final information
- OK – If you press OK, Sections 4 and 5 will close out and the form will move directly to Section 6 to input the final response. Any information you have already added to Section 4 will be copied down to Section 6
- Cancel – This will return you to the form to input the preliminary response

Skipped By - Shows the name of the person that skipped the preliminary response for this form.
Comments & Documentation
- Users can add any comments to support their response. it is required to add a response comment for the responder before signing.
- Users can also upload file attachments to their response. Click the Upload button, and perform the same steps taken when uploading files tied to comments.
- Users can also reference existing documents in the reference grid.
- Since this is only a preliminary response, users should add to what level of completeness the work is at, so the Requestor knows how much they can trust the information for their use.
Signatures
- Completing the required approvals in this section will progress the IR to Section 5: Accept Preliminary Data.
- Choose the appropriate signing option from the drop down box, and then click on the button.
- The signing options are as follows:
- Submitted – Signed by responders after they had added a response. Once submitted, the workflow will move on to the next responder. If no additional responders are listed, the workflow will progress to next section for the Responding SPOC for approval.
Section 5 - Accept Preliminary Response
On completion of Section 4 the Responding SPOC will be notified to review the response and confirm he approve the response to proceed to the requesting side for approval.
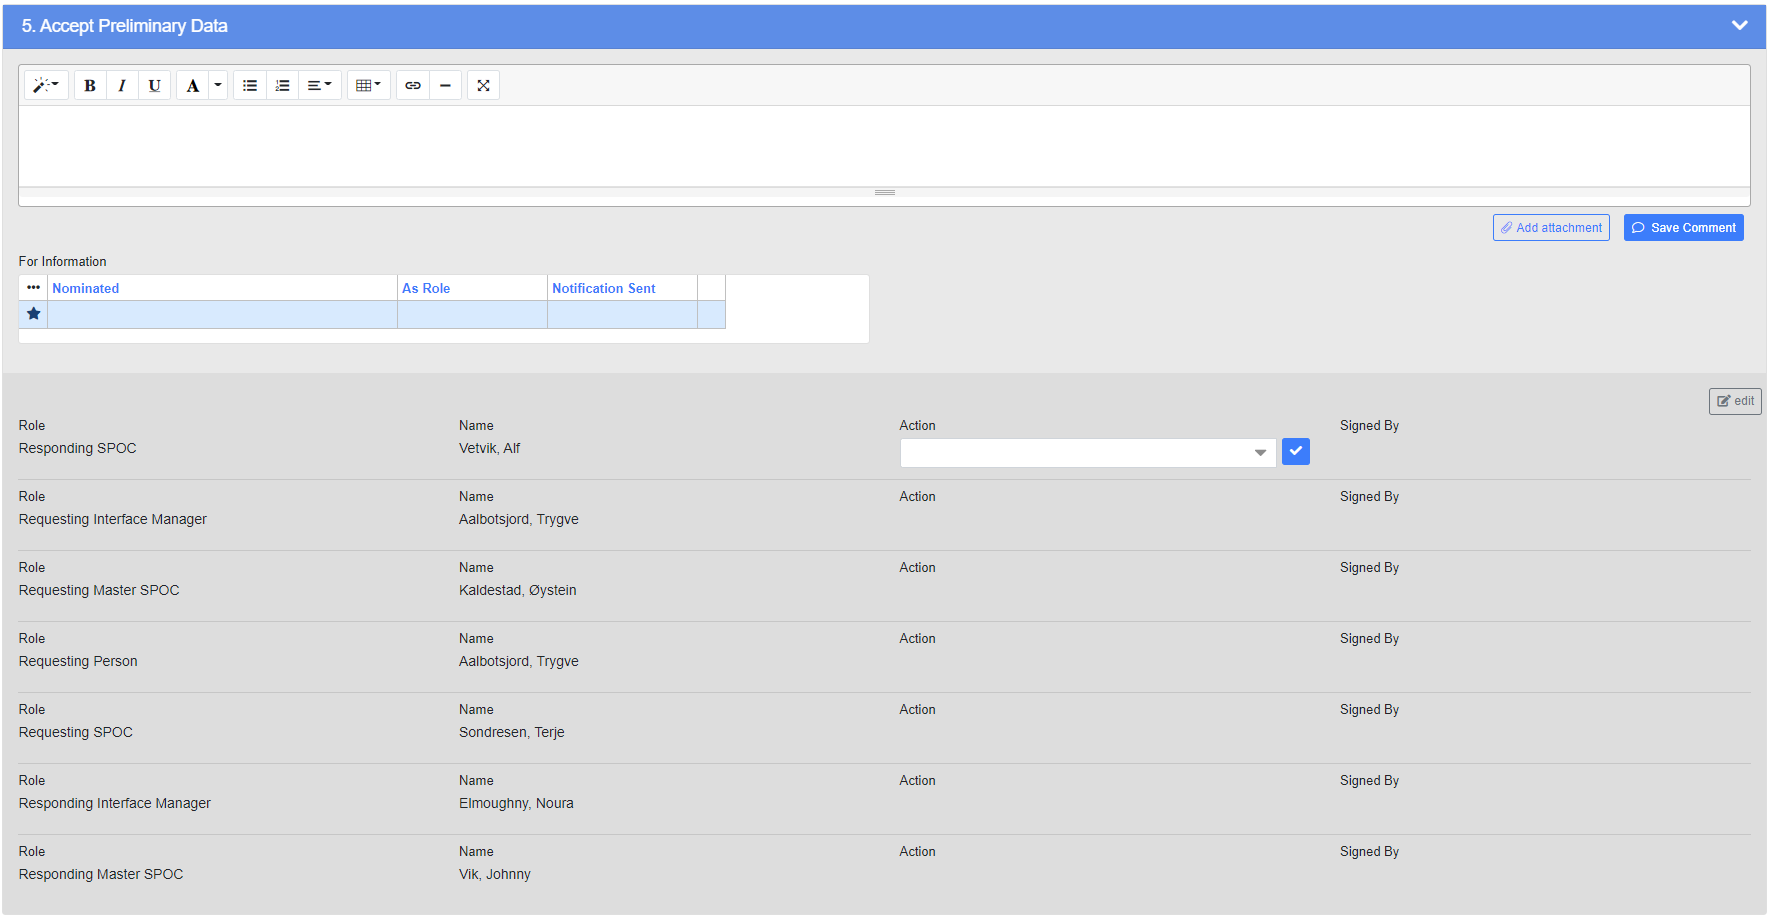
Additional Persons
- Optional: If the SPOCs wants to include additional persons on the request for the approval of the preliminary response, they can be added by clicking the edit button. The additional persons is required to sign off to close out section 5.
Add Comment
- Optional : Users can add a comment to justify their selected digital signature. In addition, any non-signing user that has access to the Scope can add comments.
Signatures
- Completing the required approvals in this section will progress the IR to Section 6: Input Final Data.
- Choose the appropriate signing option from the drop down box, and then click on the button.
The signing options are as follows:
- Approve/Endorsed/Agreed - Acceptance signatures to progress the workflow
- Recycle – If the Responding SPOC disagrees with the submitted response he can recycle to return it to the responders in Section 4. If others recycle it will recycle back to Responding SPOC for review.
The following role(s) is nominated by default
- Responding SPOC
- Requesting SPOC
- Responding Master SPOC (when in use)
- Requesting Master SPOC (when in use)
Section 6 - Provide Final Response
On completion of Section 5 (or section 2 if preliminary response is skipped) the first nominated Responder to respond will be notified by email they need to go into PIMS to provide a response.
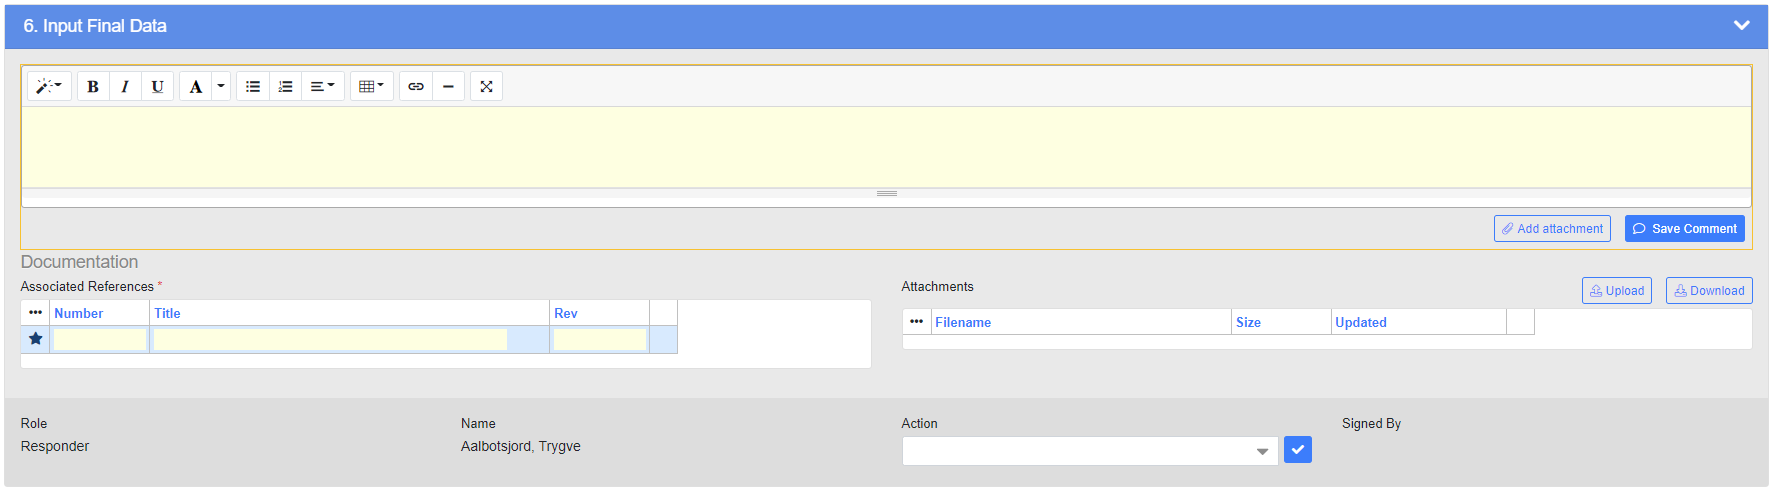
Comments & Documentation
- Users can add any comments to support their response. it is required to add a response comment for the responder before signing.
- Users can also upload file attachments to their response. Click the Upload button, and perform the same steps taken when uploading files tied to comments.
- Users can also reference existing documents in the reference grid.
Signatures
- Completing the required approvals in this section will progress the IR to Section 7: Accept Final Data.
- Choose the appropriate signing option from the drop down box, and then click on the button.
- The signing options are as follows:
- Submitted – Signed by responders after they had added a response. Once submitted, the workflow will move on to the next responder. If no additional responders are listed, the workflow will progress to next section for the Responding SPOC for approval.
Section 7 - Accept Final Response
On completion of Section 6 the Responding SPOC will be notified to review the response and confirm he approve the response to proceed to the requesting side for approval.
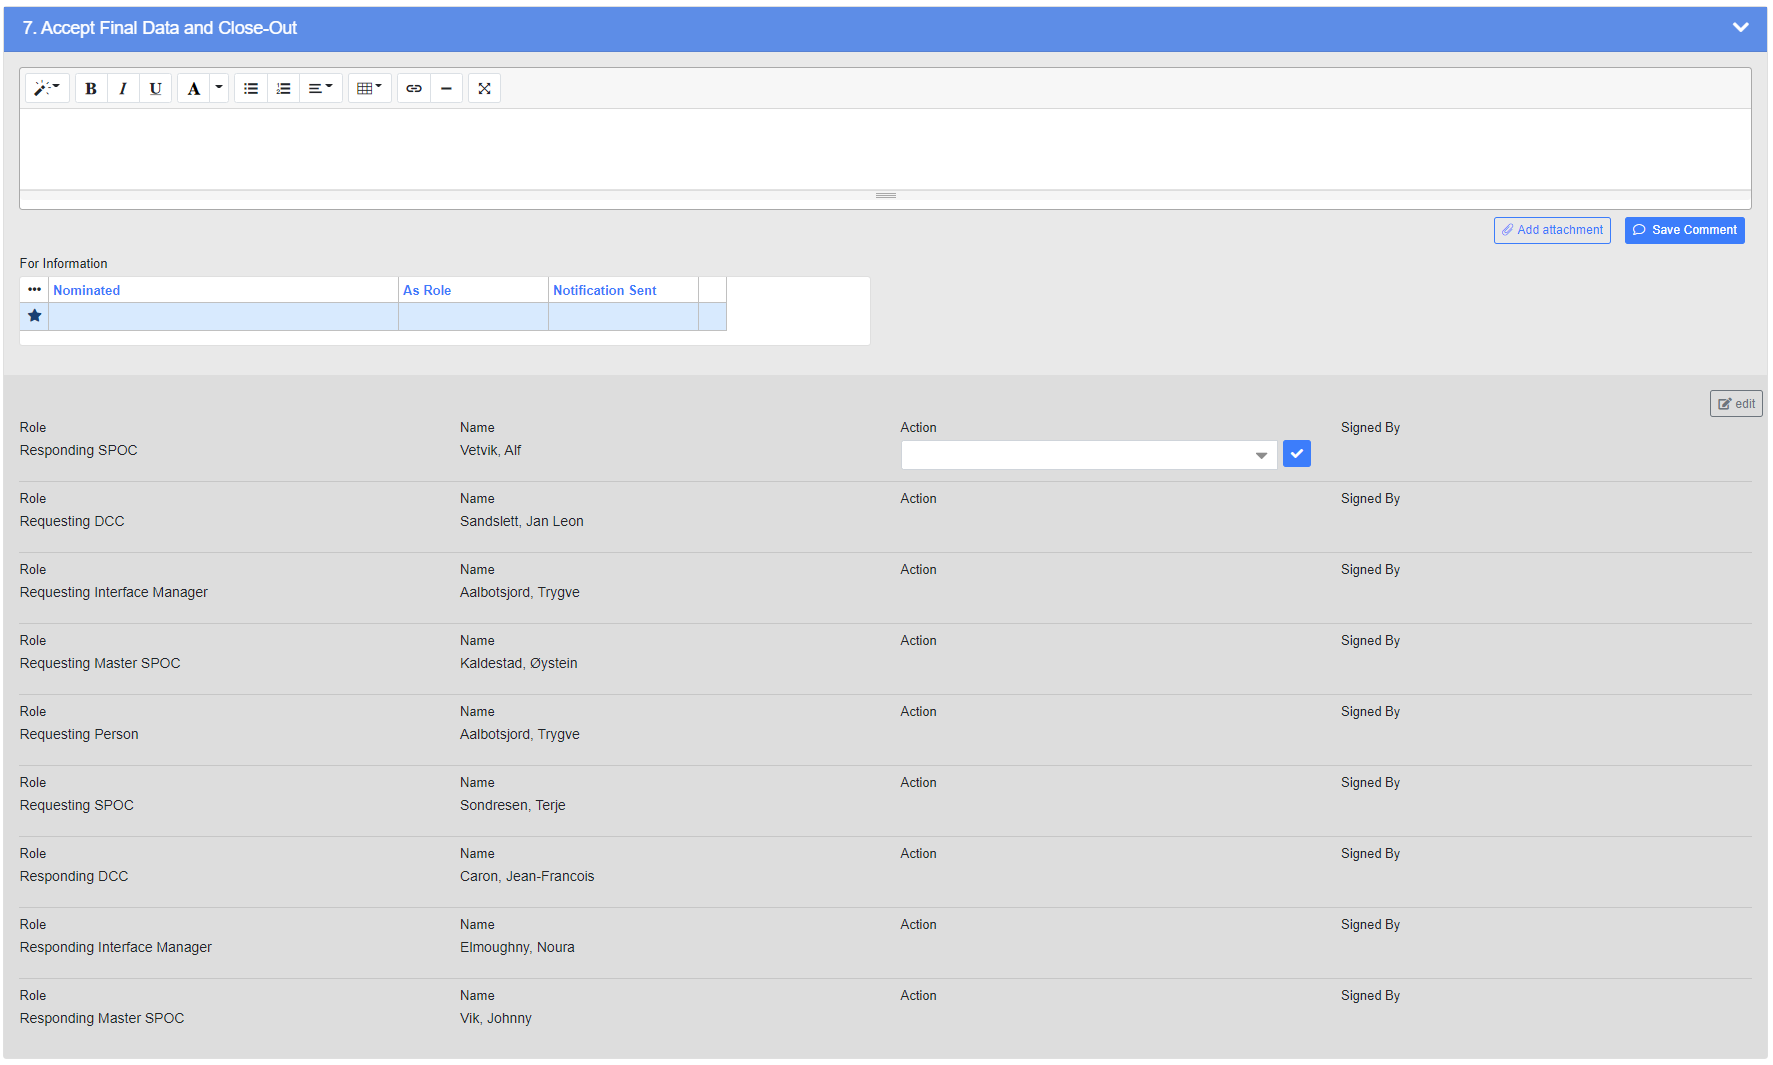
Additional Persons
- Optional: If the SPOCs wants to include additional persons on the request for the approval of the final response, they can be added by clicking the edit button. The additional persons is required to sign off to close out section 7.
Add Comment
- Optional : Users can add a comment to justify their selected digital signature. In addition, any non-signing user that has access to the Scope can add comments.
Signatures
- Completing the required approvals in this section will complete the IR.
- Choose the appropriate signing option from the drop down box, and then click on the button.
- The signing options are as follows:
- Approve/Endorsed/Agreed - Acceptance signatures to progress the workflow
- Recycle – If the Responding SPOC disagrees with the submitted response he can recycle to return it to the responders in Section 6. If others recycle it will recycle back to Responding SPOC for review.
The following role(s) is nominated by default
- Responding SPOC
- Requesting SPOC
- Requesting Person
- Responding Master SPOC (when in use)
- Requesting Master SPOC (when in use)