- About Pims
- General
- User Interface: Web
- User Interface: Win
- Administration Tools
- Procedures
- Completion Management
- General
- Setup and Configuration
- Engineering
- Field Inspection with Mobile Apps
- Project Overview
- Handovers
- Commissioning
- Scanning
- Documents and Drawings
- Windows Client
- Reference Materials
- Document Control
- General
- Managing Documents
- Accessing/Searching for Documents
- Subscribing to a Document
- Creating New Documents
- Creating Missing Document as Contractor
- Creating New Document Revision
- Reserving Revisions
- Document Profiles
- Creating native files PDF rendition
- Adding Cover Page
- Uploading New Revisions as Contractor
- Initiating Internal Collaboration
- Initiating a Document Approval
- Editing a Document Approval
- Deleting, Voiding, Superseding a Document
- Moving Document Data Between Profiles
- Checking up on Documents' Status
- Distributing Documents for Information
- Distributing Documents Using Trays
- Sending Document Reminders
- Exporting Documents as Importable Datasheets
- Offline Archives
- Importing an MDR
- Modifying Import Data
- Processing Documents Submitted by Contractors
- Distributing Documents (older version)
- Documents Import and Export (older version)
- Sharing Documents and Correspondence
- Managing Interface Documents
- Redlining Documents
- Managing Reviews
- Initiating a Document Review
- Editing Review
- Sending Review Reminders
- Adding Reviewers
- Removing Reviewers
- Performing a Review with PDF files
- Performing a Review non-PDF Files
- Performing a Review with SharePoint
- Consolidating Comments
- Returning Reviewed Documents to Contractors
- Viewing Review Comments as Contractor
- Responding to Review Comments as Contractor
- Managing Review Response Replies
- Tracking Review Status
- 3rd Party Verification
- Status of a 3rd Party Verification
- Managing Correspondence
- Operations Phase
- Understanding Asset Domain
- Understanding Site Modifications Domain
- Managing Site Modifications
- Adding Documents to Site Modification
- Handing over Documents to Operations
- Managing Conflicts in Site Modifications
- Managing Distribution Setup in Site Modifications
- Concurrent Engineering - Alternative Way of Handling Site Modifications
- Managing Certificates
- Setup and Configuration
- Setting up a Contract
- Managing Distribution Setup
- Importing Distribution Setup
- Inquiring Distribution Setup Input
- Managing Correspondence Distribution Templates
- Managing Documents Distribution Templates
- Setting up Distribution Groups
- Setting up Email Templates
- Setting up Offline Archives
- Setting up SharePoint Integration
- Setting up SharePoint filename template
- Setting up Document Cover Page Template
- Setup and Configuration
- Miscellaneous
- Cost Management
- General
- Project Control Basis
- Contracts Management
- Change Management
- Personnel
- Progress Measurement
- Interfaces
- Reporting
- Windows Client
- Workflows
- Quality Management
- General
- ITP Register
- Surveillance Register
- Activity Register
- Activity Details Management
- Activity Plan
- Checklist Register
- Finding Register
- Export, Import, Copy or Move Activity
- Program Register
- Configuration - Domain
- Configuration - Global
- Risk Management
- General
- Add New Risk
- Risk Register
- Risk Details Management
- Risk Assessments
- Actions Register
- Action Details Management
- Risk Plan
- Risks Dissemination
- Export, Import, Copy or Move Risks
- Risk Dashboard
- Configuration - Domain
- Import Setup
- Risks - Risk Breakdown Structure
- Risks - Inputs Labels
- Risks - Show/Hide Functionality
- Risks - New Risk
- Risks - Fields Setup
- Risks - Dropdown Values
- Risks - Multiple Choice
- Risks - Keywords
- Risks - Lifting Functionality
- Assessments - Configuration
- Assessments - Project Borders
- Actions - Show/Hide Functionality
- Domain Settings - Notifications
- Configuration - Global
- Configuration - Roles
- Desktop legacy user guides
- Reporting
- HSE Management
- Preparation & Execution System (PES)
- PES Release Notes
- About
- Administration
- Asset and Plant register
- Case Register
- Checklists
- Compliance Activities
- Compliance settings
- Contact Lookup
- Courses
- Currencies
- Default Colors
- Definitions and abbreviations
- Delivery Lines
- Disciplines
- Documents
- Locations
- Packages
- Position
- Position Settings
- Punch Items
- Statuses Overview
- Sub Systems
- Subsystem Handover Status
- Tag Register
- Tasks
- Work Breakdown Structure (WBS)
- Digital Procedures
- Handover
- Meetings
- Organization
- Personnel On Board (POB)
- Portal
- Progress & Trending
- Project Assurance
- Service Request
- Work Process
- Planning & Scheduling
- Material Management & Logistics
- About Material Management & Logistics
- Stock & Materials
- Procurement
- Warehouse & Packing
- Shipping & Logistics
- Rental Items
- Tool Request
- Settings
- Work Preparation & Work Order
- Work Preparation Request (WPR)
- Work Order (WO)
- Work Order Settings
- Work Orders - Settings Overview
- Work Order - Default Attachments
- Work Order - Types
- Work Order - Requirements
- Work Order - Checkpoints
- Work Order - Mhrs Type
- Work Order - Trades
- Work Order - Phases
- Work Order - Keywords
- Work Order - Hold Codes and Job Status
- Work Order - Factor sets
- Work Order - Settings
- Work Order - Norms
- Work Permit (WP)
- Livening Up & Down Notice (LUDN)
- Overtime Request Register (OTR)
- Query Management
- Query Managment - User Guide
- Workflow Modules
- General
- Setup and Configuration
- Controls
- Action Tracking
- Concessions / Deviation Requests
- Interface Management
- Management Of Change
- Technical Queries
- Lessons Learned
Technical Query Settings user guide
Technical Query Setup
Settings
Settings below can be managed in Technical Query Setup by project.
- Manage general settings for Techincal Query on the project
- Manage Scopes
- Manage Scope Members
- Manage Allowed recipients for each Scope
- Module specific roles
- Set Default Values
- Manage Impact Areas
- Define Locations
- Define the mail content for existing emails
- Setup Status distribution notifications
Accessing Settings
 Settings can be accessed from the dropdown menu by admins and module super users.
Working in the setup screens
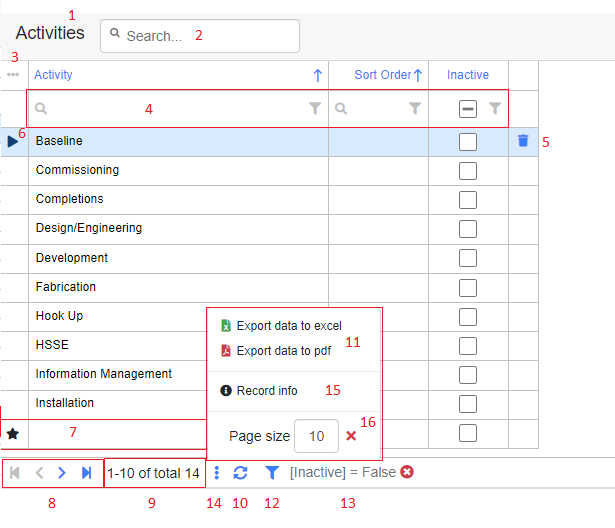
1. Header name and amount of records displayed out of total amount of records.
2. Free text search.
3. Column chooser and layout options.
4. Column filters. Free text search for that column or pick options to filter on from the filter icon.
5. Delete the selected row.
6. Selected column indicator.
7. New row. Column indicator shown as star, and enter text directly into the grid. Navigate out of the row to commit the new record.
8. Navigate between pages. Go 1 page forwards or backwards, or go to last page or first page.
9. View amount of records displayed out of total amount of records.
10. Reload the grid.
11. Export to Excel or PDF.
12. Filter builder. Allows for building simple or complex filters, store them, and load them. Most grids will have a default filter applied i.e only show active records. You can remove this filter by clicking the button and selecting the "Remove active filter" option.
13. Current active filter.
14. Open "more" to access print function etc.
15. View who created and last updated a specific record
16. Set maximum records to be displayed per page
Note: Moving columns around, hiding columns, or changing page size will be cached to the browser and remembered the next time you open the same page. Please note that this does not apply if you open the same page in another browser or on another computer. Some of the options listed above may be restricted based on the functionality or the users personal permissions, thus some options may not appear in every grid like delete ability etc.
Project Setup
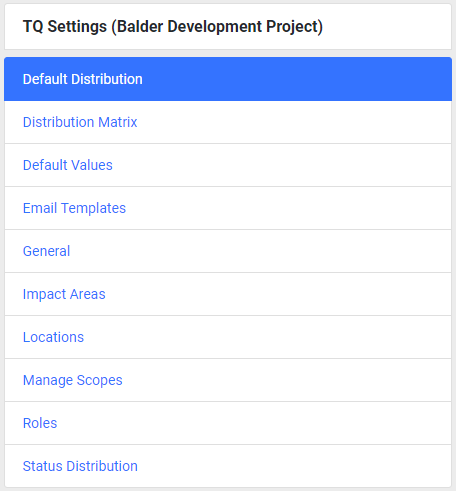
Settings that applies to the current project. Project name is displayed in brackets at the top of the menu. Global/Project Admins module Super Users that has access to multiple project must use the change domain functionality to change their current domain to be able to edit settings for another project.
Note : Most of the settings that can be edited in the setup will apply directly for forms updated after the settings was edited, i.e if you set a value to be inactive it will immediately no longer appear in the list of values inside any form but it will still remain selected on existing forms where previously used.
Global Setup
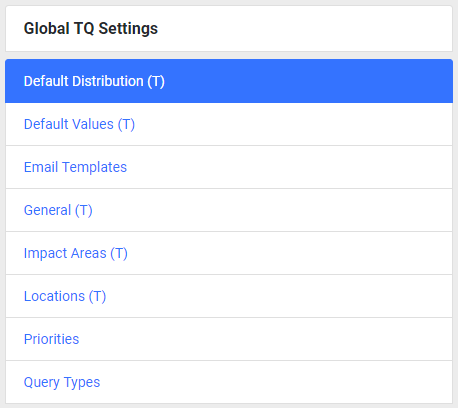
The Global Template Project is used as a template for project settings. Any changes to global template tabs marked with "(T)" will act as defaults to be imported for new projects on creation. If updated these changes will not affect any oth the existing projects. Global Setup can only be managed by Global Administrators by changing their domain to "GlobalTemplate".
Tabs
Note : All tabs showing a (T) after the name will also have an initial global setup for the values.
Default Distribution (T)
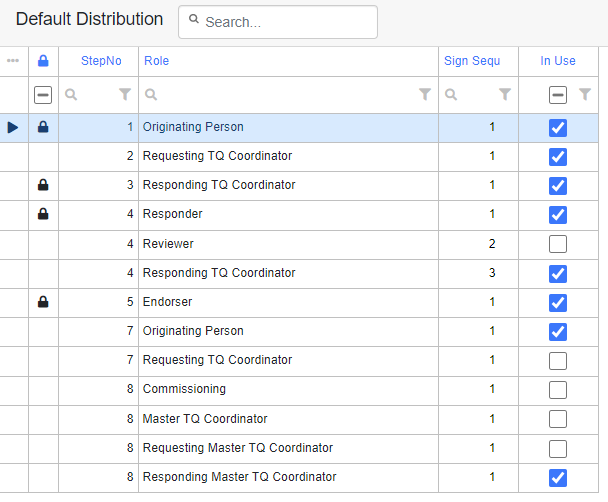
The Default Distribution is used for defining the inclusion of signature Interface Management roles for your project. This is also available as a template on global which is copied down when creating new projects. You can only modify the existing setup for the roles in each section by turning them on/off or setting them to be included for information instead of having a required signature on the form. You cannot add new roles or move the existing between sections. Roles that are indicated with a padlock icon are mandatory signatures that cannot be set to not in use but only changed sign sequence of. By setting a role to information it means that the role will be included as a mail recipient on the form and be notified once the form reaches that section or when that section is being completed which can be set by selecting the "notify on step completion" option.
Distribution Matrix
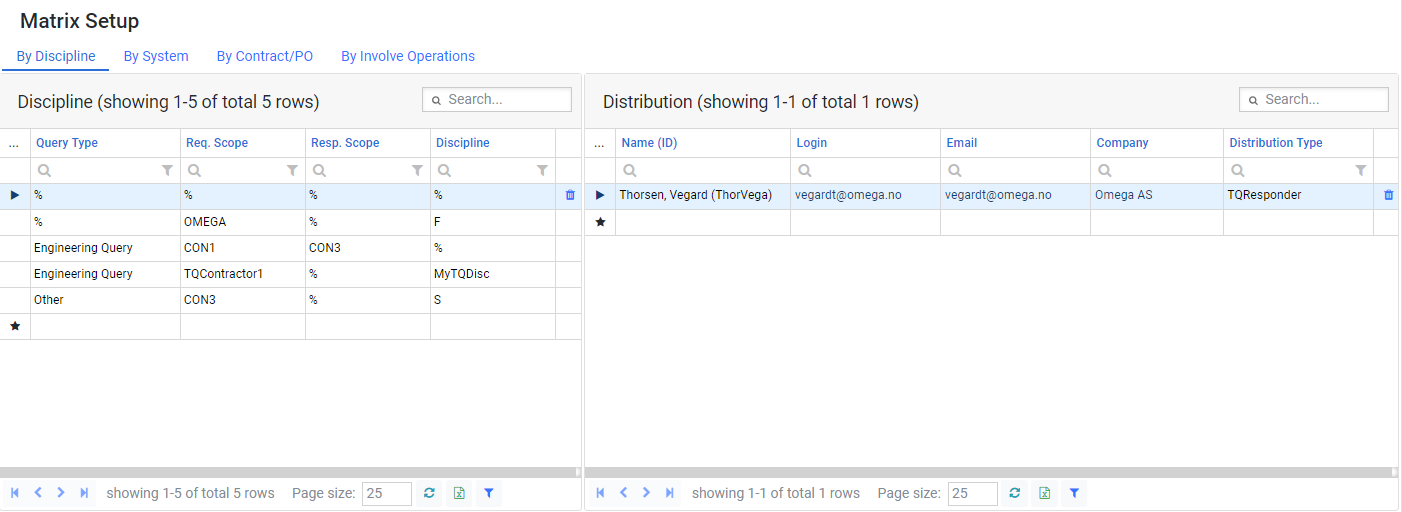
This setup allows you to define persons available for specific roles that should be linked against specific fields on the form like discipline, system, contract or involve operations. The roles that you can define persons against are Endorsers, Responders and Reviewers. You can either set the specific combination of query type, scopes and field value, set value to % for any to make it applicable to all combinations. If no user is specifically selected the form will show all users that has access to the module in these roles.
Default Values (T)
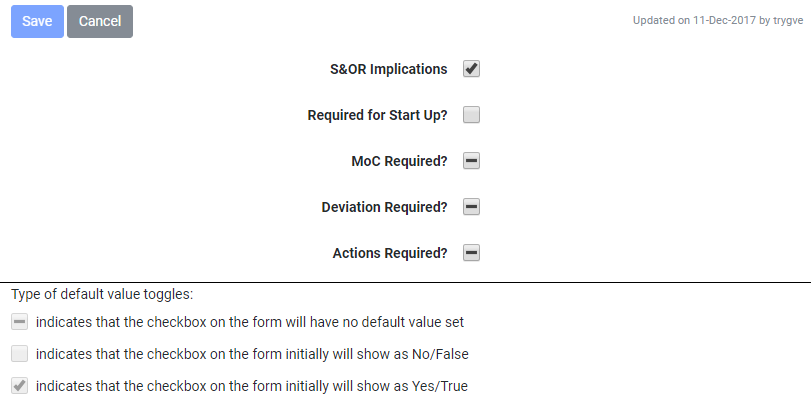
In this tab you can configure a default selection of listed fields. When a new form is raised the value of the field will be set per what is configured here.
Email Templates
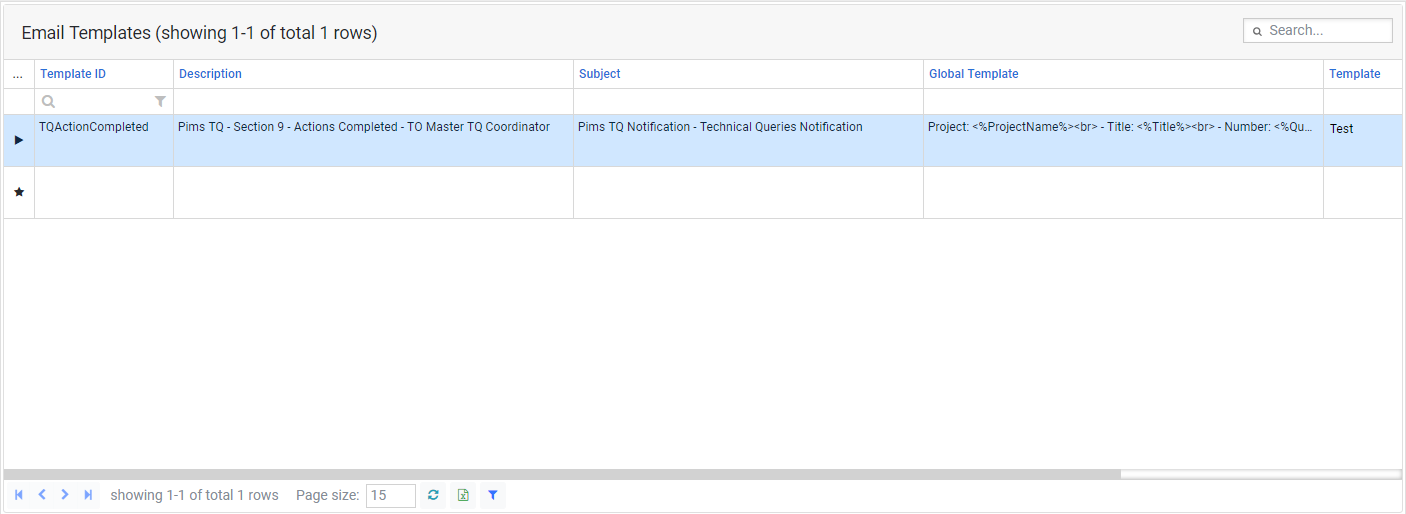
When opened from the global template this will display all email templates that are used within the module. Then at the project level after you are allowed to edit the content of the email templates used if required to differ from the standard template. The project setup will initially be empty for each project as it would use all from global setup, if you then add a new version of a specific module template at project level it will prioritize using this instead.
General (T)
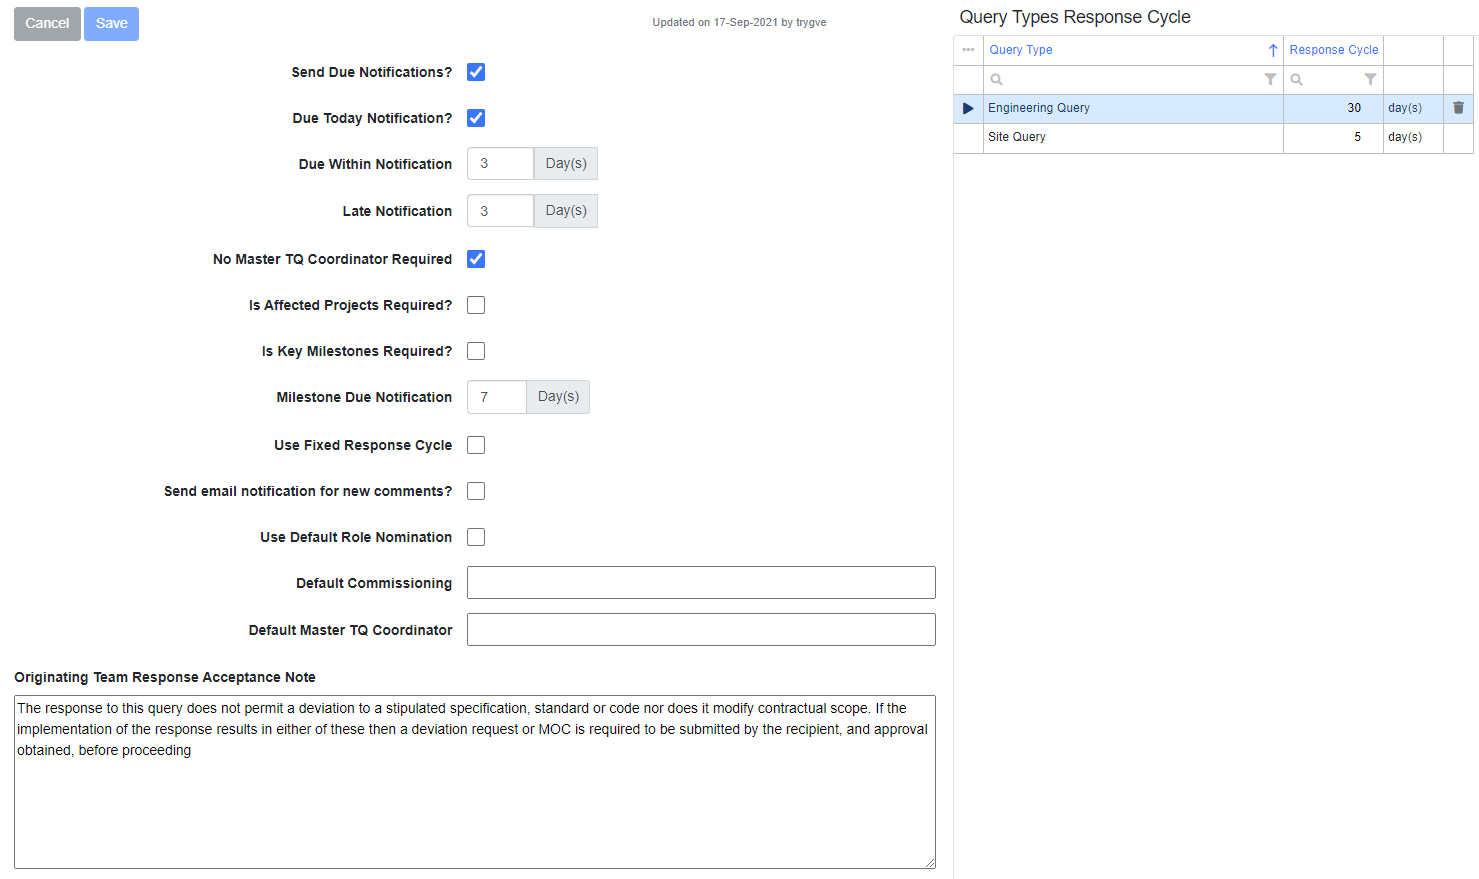
This tab is used to set managing available predefined values for fields to be used in the forms.
Due Today Notification : Sends due notification for forms due today.
Due Within Notification : Set number of days for sending of out due notification mails. This mail will only be triggered once for each form at the specified amount of days set.
Late Notification : Set number of days for sending of out late notification mails. This mail will only be triggered once for each form at the specified amount of days set.
No Master TQ Coordinator Required : Set if Master TQ Coordinator role is not mandatory to include on the form.
Is Affected Projects Required? : Set if affected projects control should be in use and required.
Is Key Milestones Required? : Set if key milestones control should be in use and required.
Milestone Due Notification : Set the amount of days to send a notification to next to sign of milestone due date
Use Fixed Response Cycle : Set if the predefined amount of days should be used for auto setting dates on the form or if the users needs to set dates manually.
Use Default Role Nomination : Set if the default role nomination should be used. This can be used to set a default Master TQ Coordinator or Comissioning role to be auto nominated on all forms. Note : This option is only available when distribution option is set to "Project distribution list".
Default Commissioning : Set a default Commissioning responsible.
Default Master TQ Coordinator : Set a default Master TQ Coordinator responsible.
Distribution : Set type of distribution to use, options are "Project distribution list" or "Distribution matrix".
Originating Team Response Acceptance Note : Set the content value of the text being used for the acceptance note.
Query Types Response Cycle : Set specific amount of days auto set for target completion by query type based on the date form was initially submitted.
Impact Areas (T)

Manage the impact area values that should be available for the project. The default checkbox can be used to auto include the impact on form creation, if not set as default the value must be included manually on the form when applicable.
Locations (T)

Manage the location values that should be available for the project.
Manage Scopes
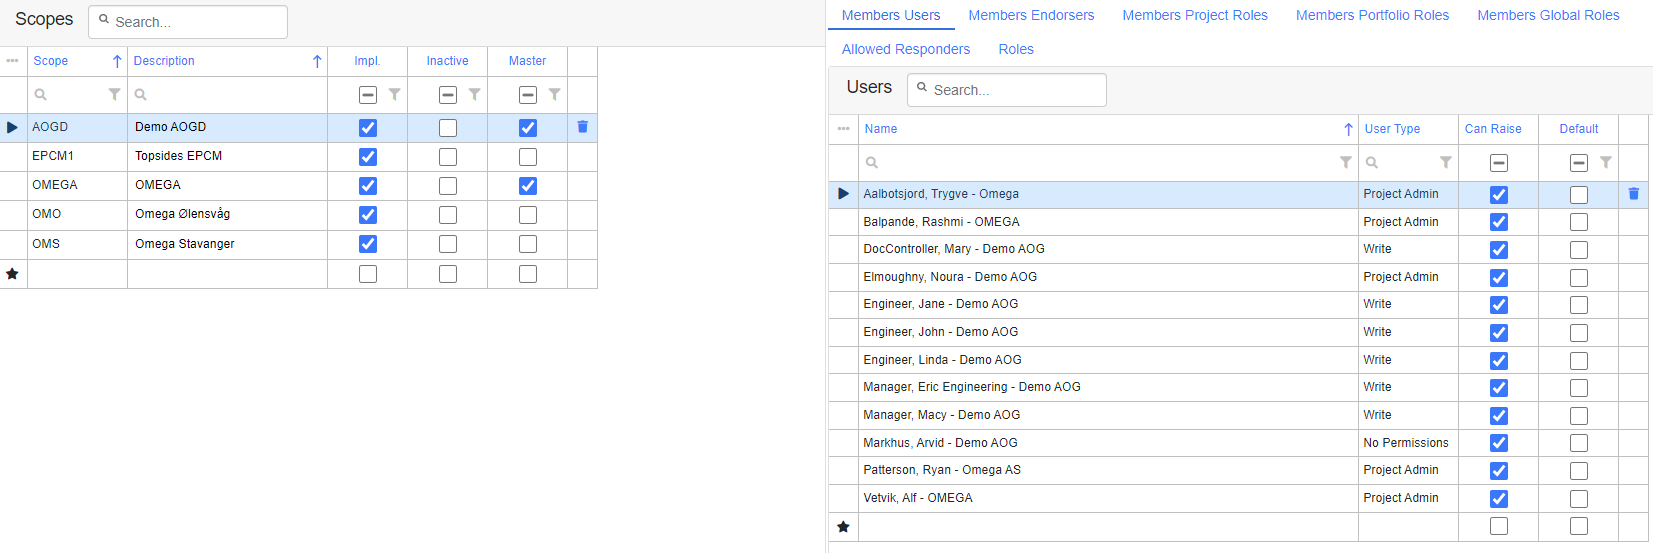
Scope is a general term used by Omega for a group of persons working together on the same contract delivering a service to another part. For smaller projects it will normally only be persons from the same contractor within the same scope. The system is setup to be as flexible as possible by allowing any grouping of members to be defined. Any users that has access to the module can be inserted as members of a Scope. When a user is added a a member he will automatically get access to all forms where this Scope is involved. The Scopes are not shared between projects and must be setup individually, you can have a "ScopeA" in ProjectA and a "ScopeA" in ProjectB which has completely different setup and members. Once a Scope has been setup use the Implemented check to indicate that the Scope is now ready for use.
1. Defines the Scopes.
2. Assign members to the Scope. Members can be added either by adding a specific user directly or by adding a role containing multiple users. If you add a role all users within that role will be granted membership to the Scope.
3. Define what other Scopes it can communicate within the allowed responders tab. Note: The communication are only setup one way, so adding "ScopeB" as allowed responder for "ScopeA" will only allow for ScopeA to communicate with ScopeB, you will need to also select ScopeB and add ScopeA to be an allowed responder for this to allow communication in both ways.
4. Define the role responsbles as required for each Scope.
Scope Access
Ability to view forms within the module is by default restricted to scope membership for normal users that are not Master Company users. Master Company is the main owner of the system, so for an internal site in Omega the master company will be Omega. This means that all users that has company set to Omega in the user setup and has access to the module will automatically be allowed to view all forms for projects they have access to without having specific access to each Scope as a member.
Access Rules
- 1. User has access to the module (either directly or indirectly as admin). This is a prerequisite for all the options below.
- 2.1 User is a Master Company User, or has the Inherit Master Company permissions checked in the user setup.
- 2.2 User Is a Member of either the forms Requesting or Responding Scope involved on the form for the specific project.
- 2.3 User has a signature on the form.
- 2.4 User is set as Delegate for a user that has a signature on the form.
Note : Only users that are actually a direct member of the Scope can create new forms for that Scope. This means that admins will not have access to raise any forms unless they have also been added as scope member separately.
Scope Allowed Responders
Select which scopes each of the scopes should be able to communicate with. If a scope should no longer be able to raise forms to another scope the scope can be set to inactive directly in the allowed responders list disabling it for this specific scope.
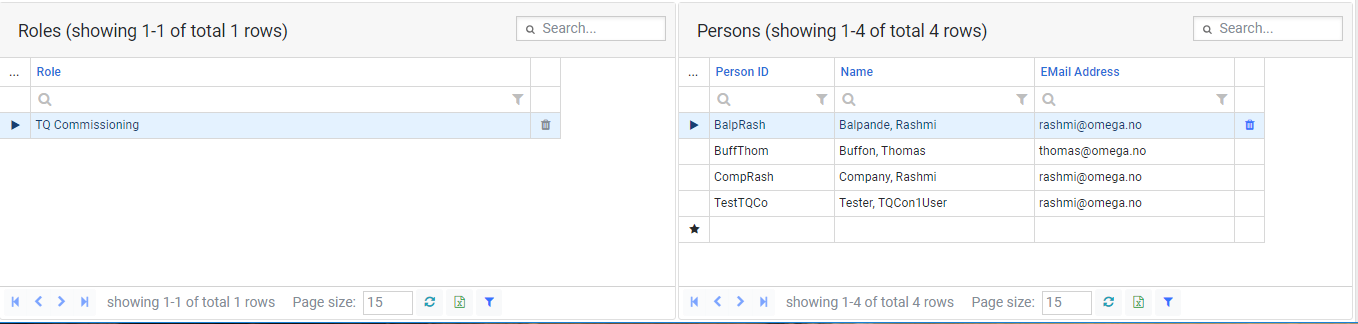
Roles
Set roles for each scope. A Coordinator is always required as a minimum to be set.
Roles can be set/changed by clicking edit on the role and then select a new person in the role or the clear button to empty the role.
Note : Only persons that have already been added as scope members can be set in the roles.
Priority (Global only)
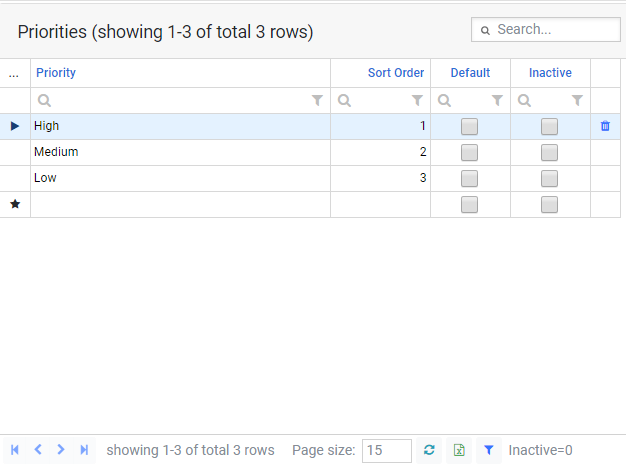
Manage the priority values that should be available for the system.
Roles
Manage the role members of available module roles.
Status Distribution
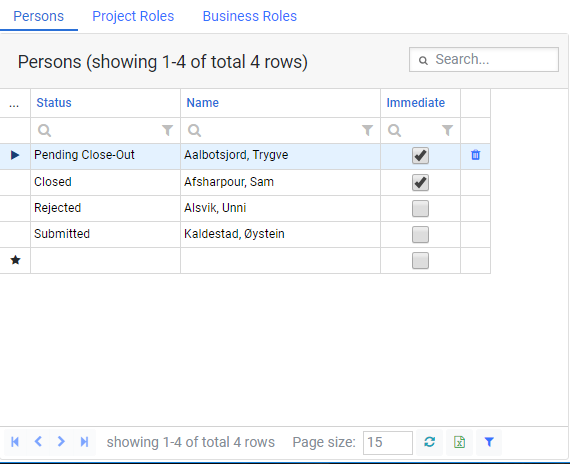
The status distribution is included on all workflow modules. Here you can setup user/role subscriptions linked directly to the form statuses. The system will send out mail to the user when a status is being set to the selected subscribed status on a form. The notification will by default follow each users personal email notification settings, if you want to bypass this and always send the status notification immediately you can tick this box.
Query Types (Global only)
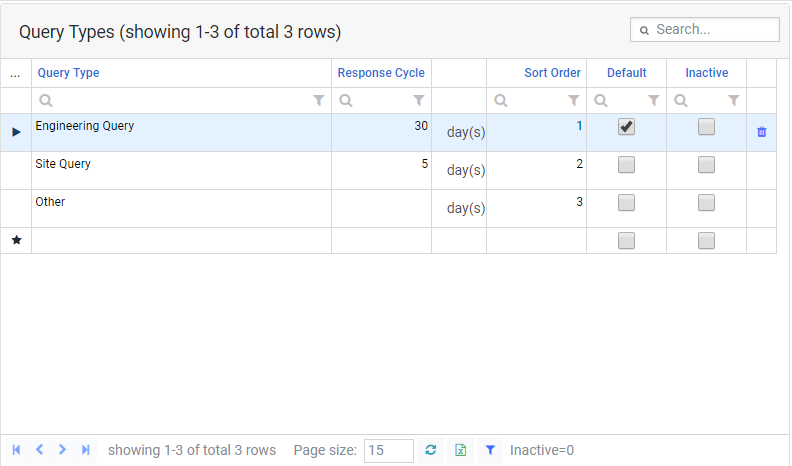
Manage the query type values that should be available for the system.