- About Pims
- General
- User Interface: Web
- User Interface: Win
- Administration Tools
- Procedures
- Completion Management
- General
- Setup and Configuration
- Engineering
- Field Inspection with Mobile Apps
- Project Overview
- Handovers
- Commissioning
- Scanning
- Documents and Drawings
- Windows Client
- Reference Materials
- Document Control
- General
- Managing Documents
- Accessing/Searching for Documents
- Subscribing to a Document
- Creating New Documents
- Creating Missing Document as Contractor
- Creating New Document Revision
- Reserving Revisions
- Document Profiles
- Creating native files PDF rendition
- Adding Cover Page
- Uploading New Revisions as Contractor
- Initiating Internal Collaboration
- Initiating a Document Approval
- Editing a Document Approval
- Deleting, Voiding, Superseding a Document
- Moving Document Data Between Profiles
- Checking up on Documents' Status
- Distributing Documents for Information
- Distributing Documents Using Trays
- Sending Document Reminders
- Exporting Documents as Importable Datasheets
- Offline Archives
- Importing an MDR
- Modifying Import Data
- Processing Documents Submitted by Contractors
- Distributing Documents (older version)
- Documents Import and Export (older version)
- Sharing Documents and Correspondence
- Managing Interface Documents
- Redlining Documents
- Managing Reviews
- Initiating a Document Review
- Editing Review
- Sending Review Reminders
- Adding Reviewers
- Removing Reviewers
- Performing a Review with PDF files
- Performing a Review non-PDF Files
- Performing a Review with SharePoint
- Consolidating Comments
- Returning Reviewed Documents to Contractors
- Viewing Review Comments as Contractor
- Responding to Review Comments as Contractor
- Managing Review Response Replies
- Tracking Review Status
- 3rd Party Verification
- Status of a 3rd Party Verification
- Managing Correspondence
- Operations Phase
- Understanding Asset Domain
- Understanding Site Modifications Domain
- Managing Site Modifications
- Adding Documents to Site Modification
- Handing over Documents to Operations
- Managing Conflicts in Site Modifications
- Managing Distribution Setup in Site Modifications
- Concurrent Engineering - Alternative Way of Handling Site Modifications
- Managing Certificates
- Setup and Configuration
- Setting up a Contract
- Managing Distribution Setup
- Importing Distribution Setup
- Inquiring Distribution Setup Input
- Managing Correspondence Distribution Templates
- Managing Documents Distribution Templates
- Setting up Distribution Groups
- Setting up Email Templates
- Setting up Offline Archives
- Setting up SharePoint Integration
- Setting up SharePoint filename template
- Setting up Document Cover Page Template
- Setup and Configuration
- Miscellaneous
- Cost Management
- General
- Project Control Basis
- Contracts Management
- Change Management
- Personnel
- Progress Measurement
- Interfaces
- Reporting
- Windows Client
- Workflows
- Quality Management
- General
- ITP Register
- Surveillance Register
- Activity Register
- Activity Details Management
- Activity Plan
- Checklist Register
- Finding Register
- Export, Import, Copy or Move Activity
- Program Register
- Configuration - Domain
- Configuration - Global
- Risk Management
- General
- Add New Risk
- Risk Register
- Risk Details Management
- Risk Assessments
- Actions Register
- Action Details Management
- Risk Plan
- Risks Dissemination
- Export, Import, Copy or Move Risks
- Risk Dashboard
- Configuration - Domain
- Import Setup
- Risks - Risk Breakdown Structure
- Risks - Inputs Labels
- Risks - Show/Hide Functionality
- Risks - New Risk
- Risks - Fields Setup
- Risks - Dropdown Values
- Risks - Multiple Choice
- Risks - Keywords
- Risks - Lifting Functionality
- Assessments - Configuration
- Assessments - Project Borders
- Actions - Show/Hide Functionality
- Domain Settings - Notifications
- Configuration - Global
- Configuration - Roles
- Desktop legacy user guides
- Reporting
- HSE Management
- Preparation & Execution System (PES)
- PES Release Notes
- About
- Administration
- Asset and Plant register
- Case Register
- Checklists
- Compliance Activities
- Compliance settings
- Contact Lookup
- Courses
- Currencies
- Default Colors
- Definitions and abbreviations
- Delivery Lines
- Disciplines
- Documents
- Locations
- Packages
- Position
- Position Settings
- Punch Items
- Statuses Overview
- Sub Systems
- Subsystem Handover Status
- Tag Register
- Tasks
- Work Breakdown Structure (WBS)
- Digital Procedures
- Handover
- Meetings
- Organization
- Personnel On Board (POB)
- Portal
- Progress & Trending
- Project Assurance
- Service Request
- Work Process
- Planning & Scheduling
- Material Management & Logistics
- About Material Management & Logistics
- Stock & Materials
- Procurement
- Warehouse & Packing
- Shipping & Logistics
- Rental Items
- Tool Request
- Settings
- Work Preparation & Work Order
- Work Preparation Request (WPR)
- Work Order (WO)
- Work Order Settings
- Work Orders - Settings Overview
- Work Order - Default Attachments
- Work Order - Types
- Work Order - Requirements
- Work Order - Checkpoints
- Work Order - Mhrs Type
- Work Order - Trades
- Work Order - Phases
- Work Order - Keywords
- Work Order - Hold Codes and Job Status
- Work Order - Factor sets
- Work Order - Settings
- Work Order - Norms
- Work Permit (WP)
- Livening Up & Down Notice (LUDN)
- Overtime Request Register (OTR)
- Query Management
- Query Managment - User Guide
- Workflow Modules
- General
- Setup and Configuration
- Controls
- Action Tracking
- Concessions / Deviation Requests
- Interface Management
- Management Of Change
- Technical Queries
- Lessons Learned
Pims HSE - General
Most HSE modules have the same structure, which is described in this section. Modules that deviate from this standard are described separately.
Data lists
Common functionality for all Pims lists is described in https://docs.omega365.com/?Area-ID=10002&Name=SOL-PROC-USG-00345
Only special features for Pims HSE lists are mentioned here.
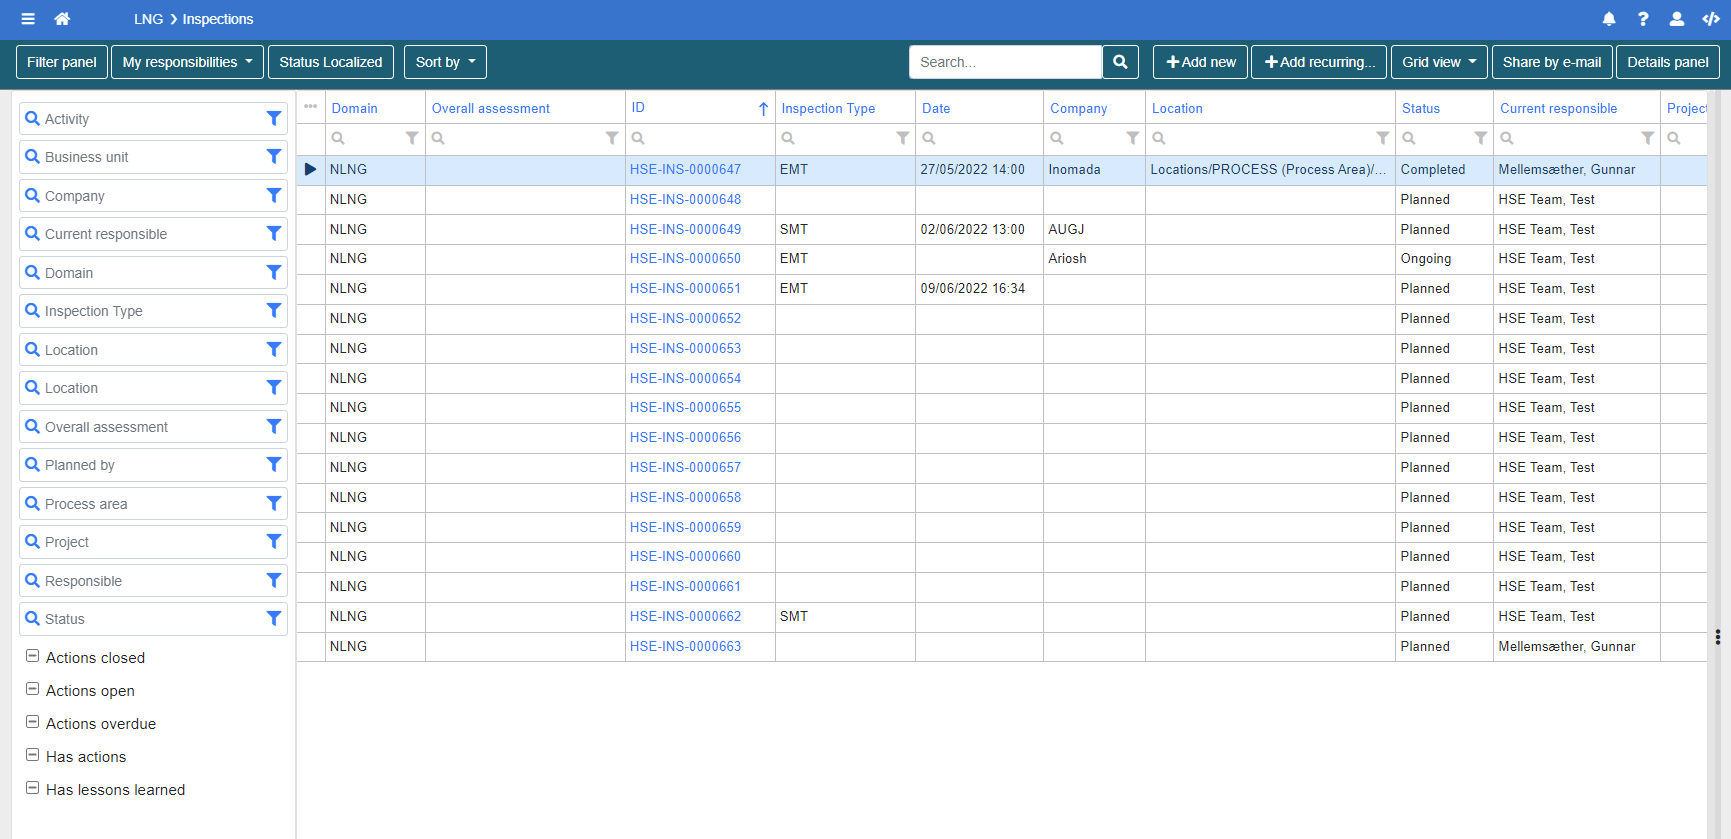
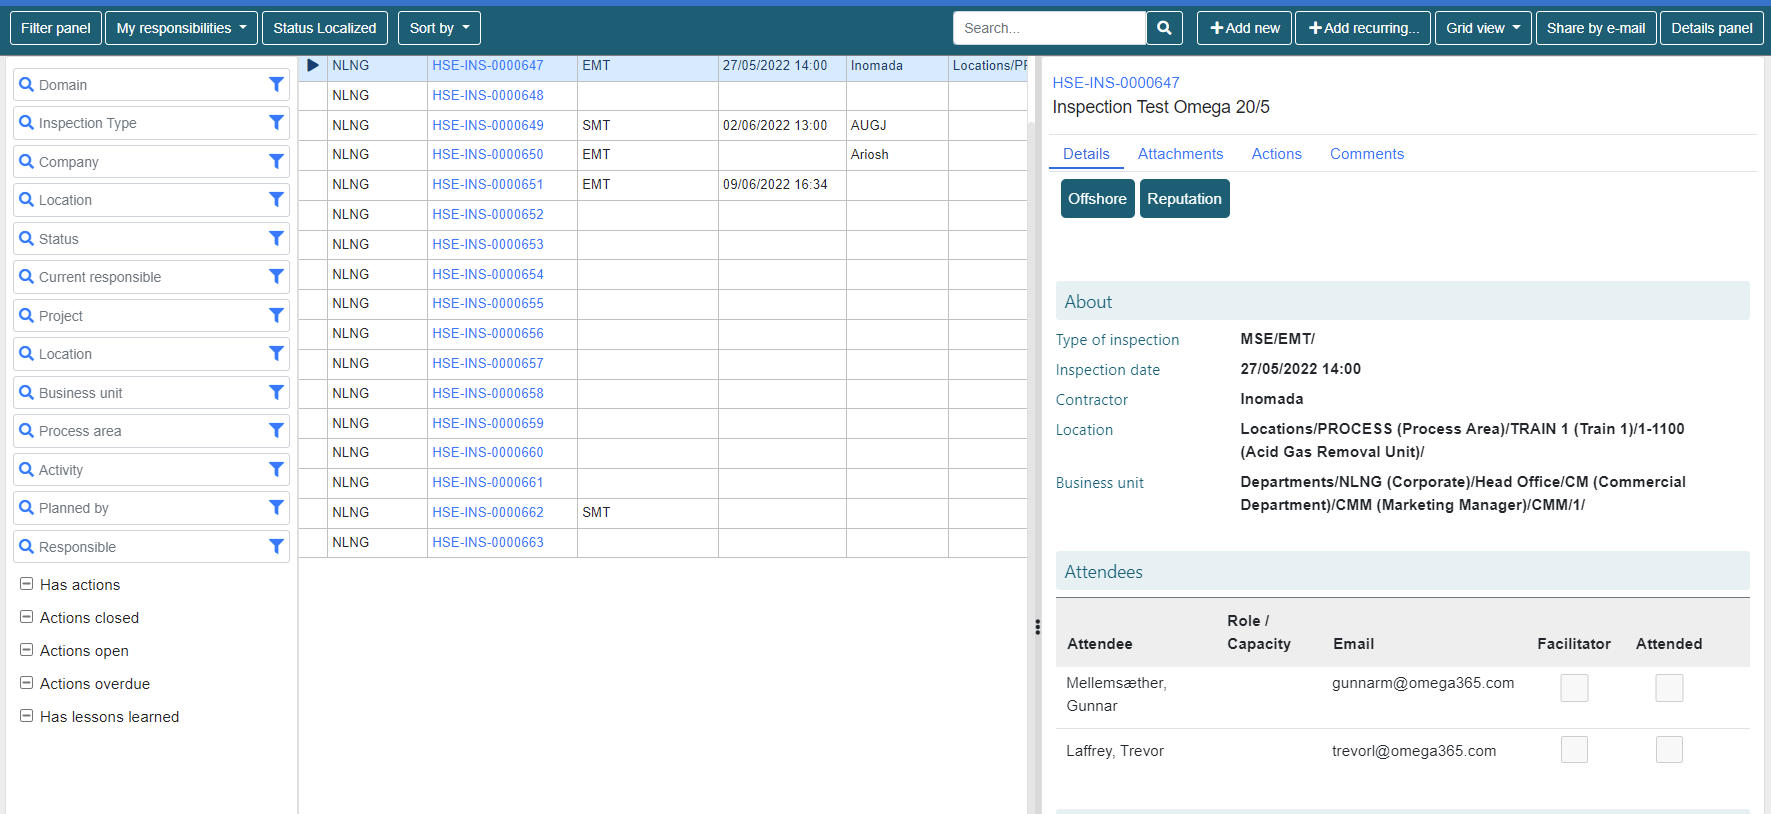
Filter Panel
Filter panel is displayed by default when lists are opened. The filter can be hidden by clicking the Filter Panel button
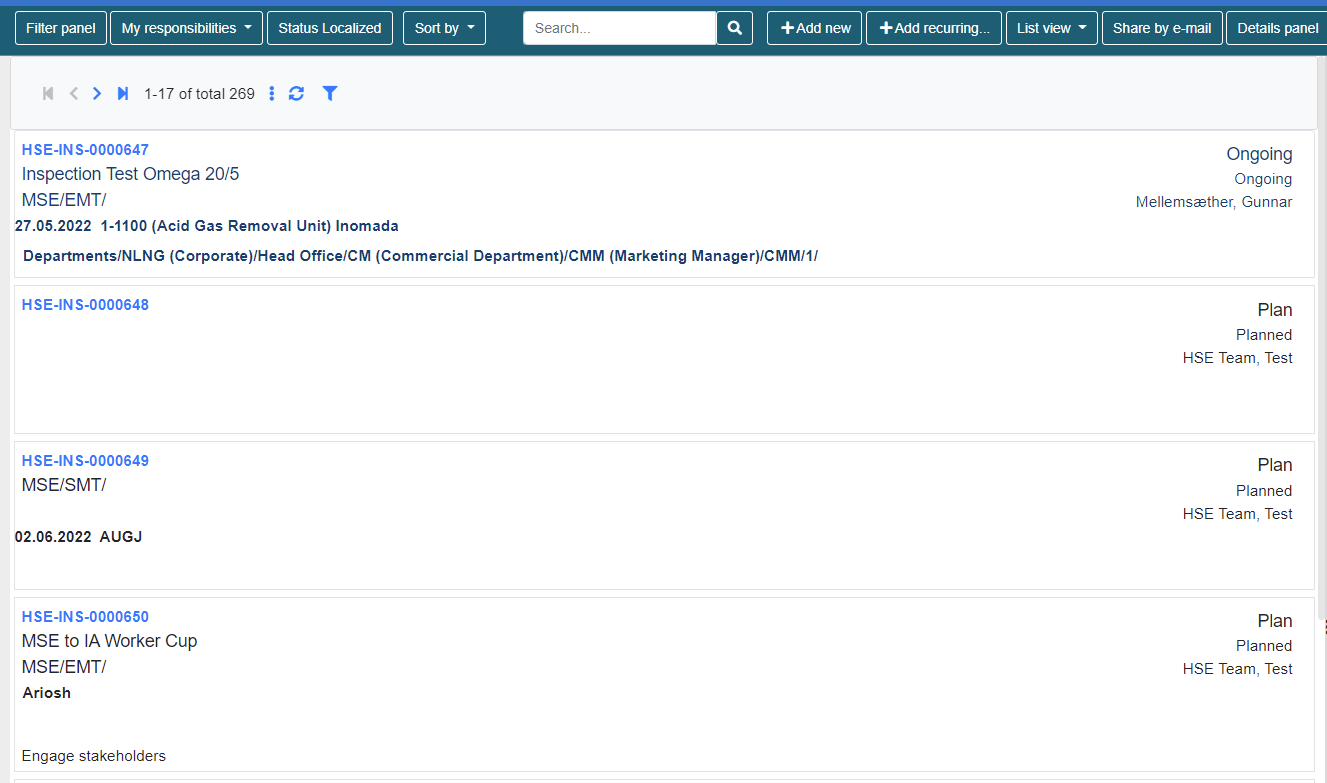
 List with filter panel
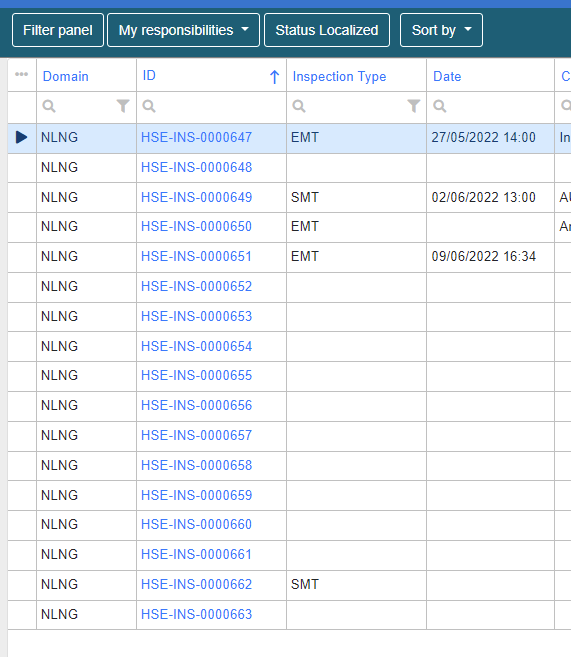
 List without filter panel
Add New
Click this button to add a new record. Details screen for the record will appear automatically.
Add Recurring
This button will appear on some of the Pims HSE modules.
When you click this button you will be taken to a screen to specify the frequency and schedule for the recurrence.
The highlighted record in the list will be used as a basis for the recurring records.
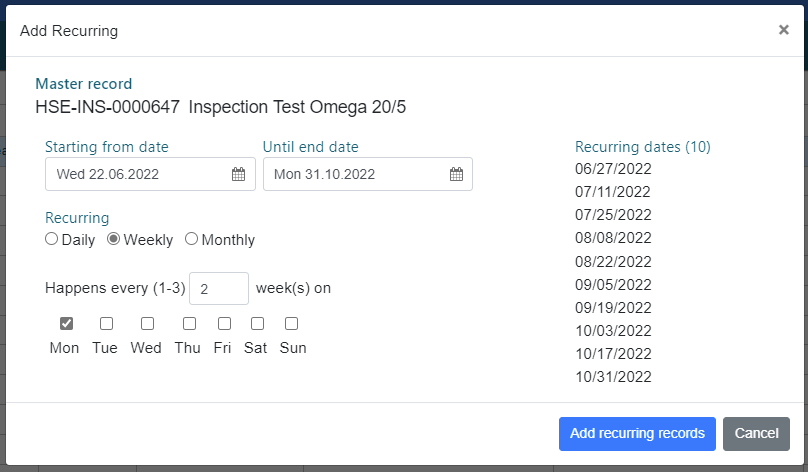 No records will be created until you click the button "Add recurring records".
You will also be able to see for which dates the recurring records will be created under the heading "Recurring dates".
Grid View
By default the lists in Pims HSE will open in grid view.
By clicking the button "Grid view" you can change how you view the data.
List view
Data is displayed like cards with key information
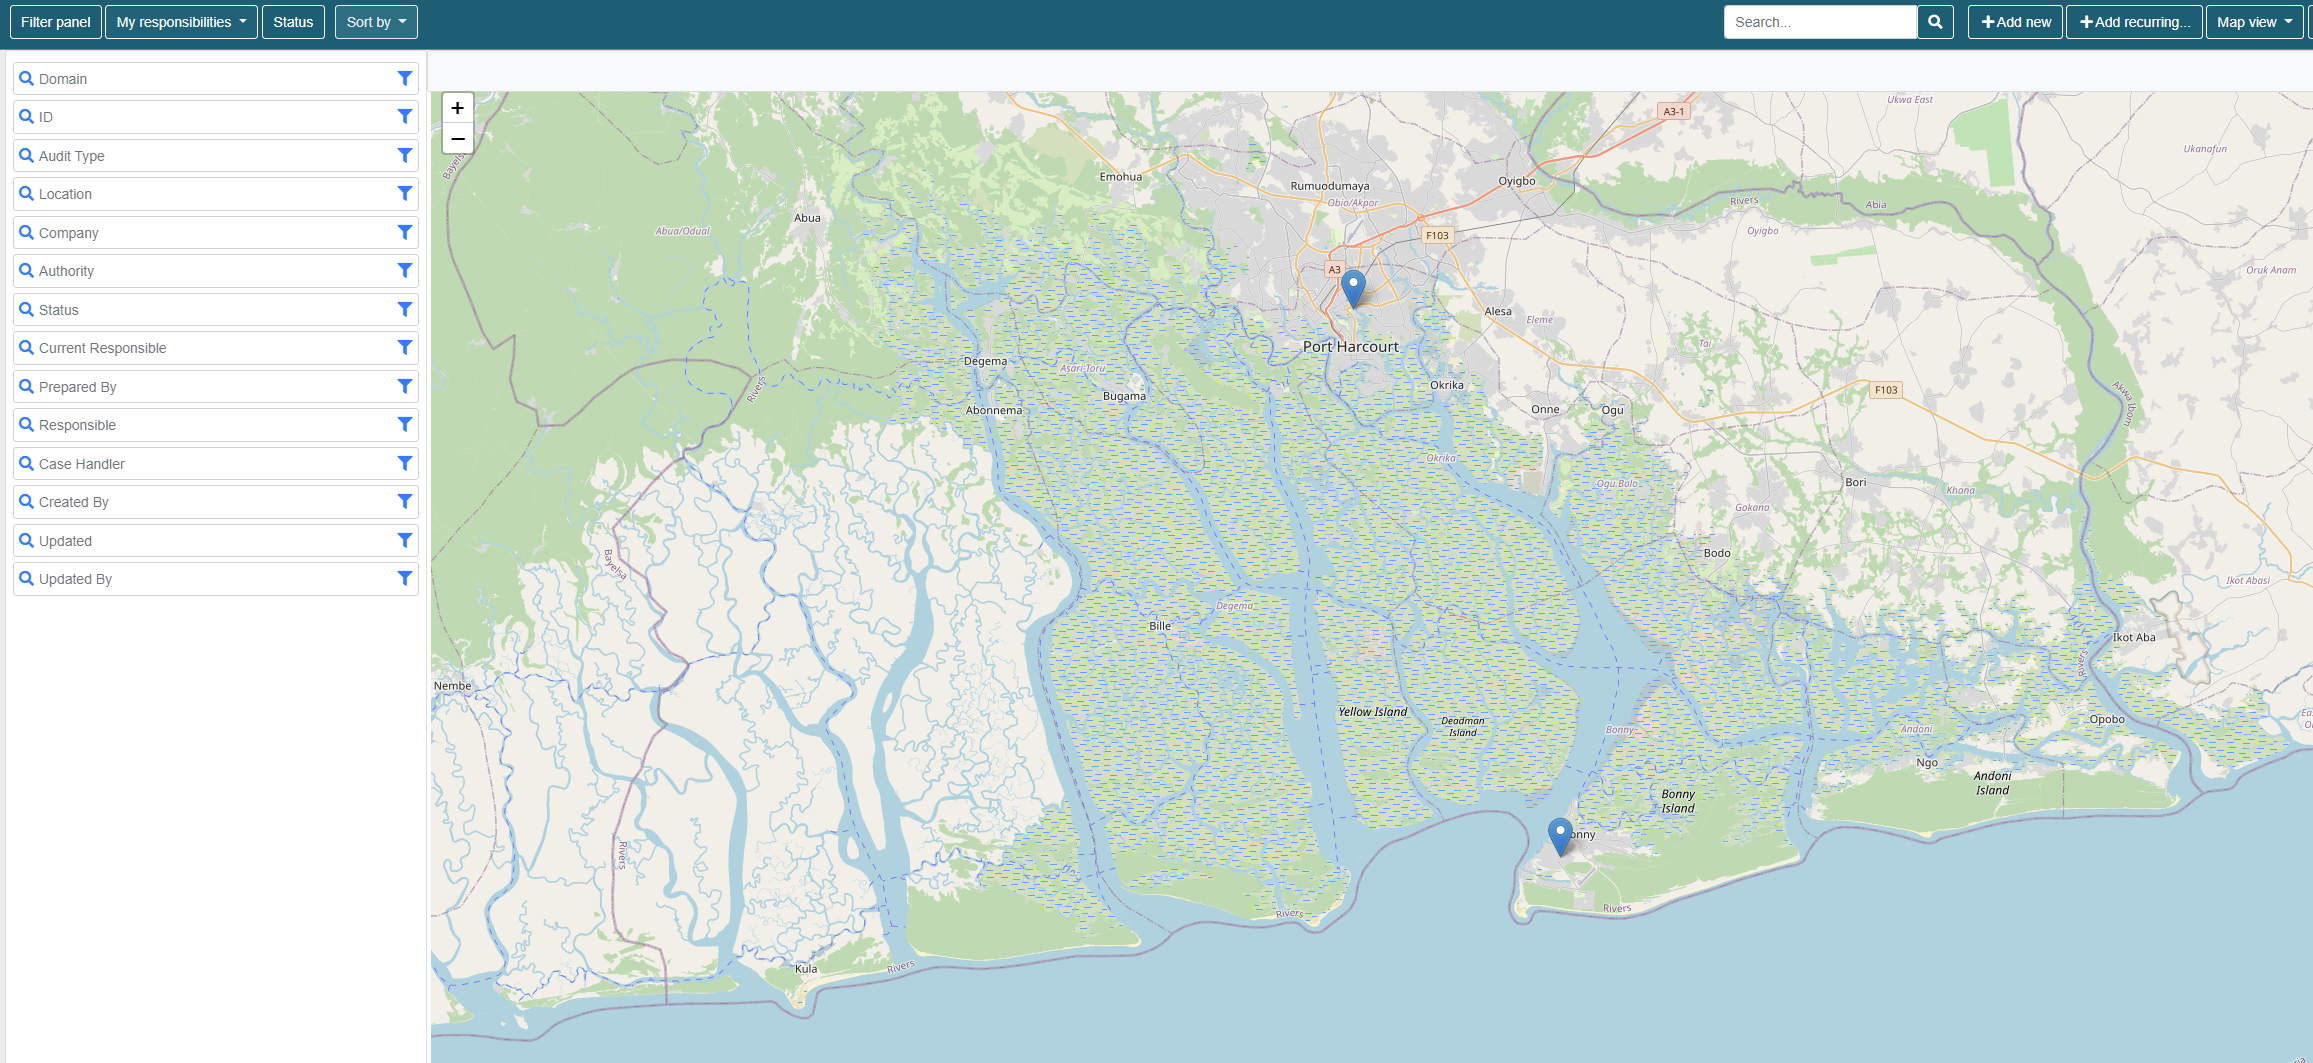
Map view
This will be valid only for modules that record information about location.
If a location in the setup is specified with longitude and latitude it will be displayed on the map view with a marker.
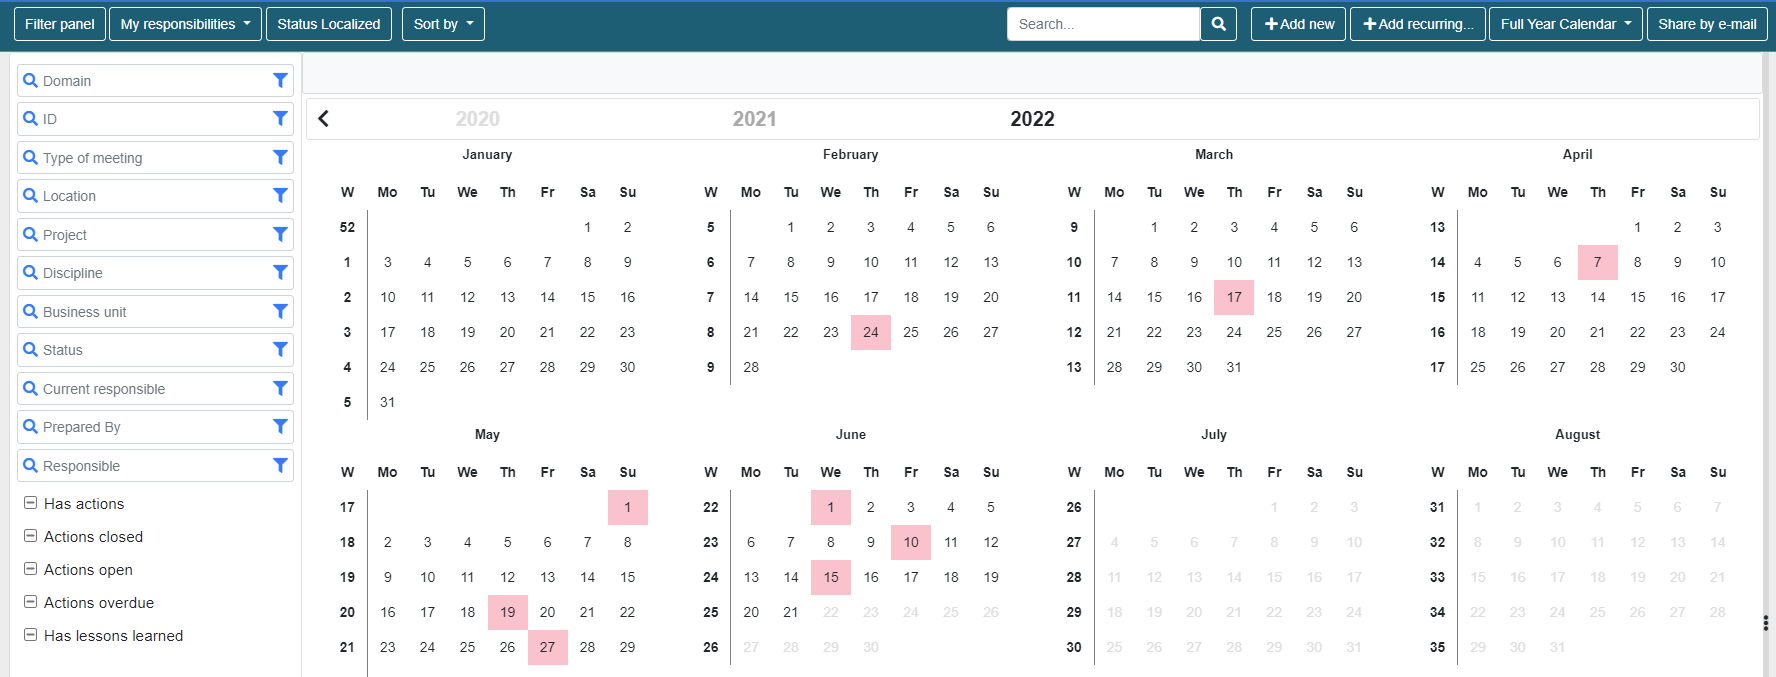
Full Year Calendar
This will highlight dates in calendar related to key date of the specific module. For Meetings for instance this will be Meeting Date (and created date if not set).
You can click on a date to see which records are recorded against this date, and also open these records from the date pop-up.
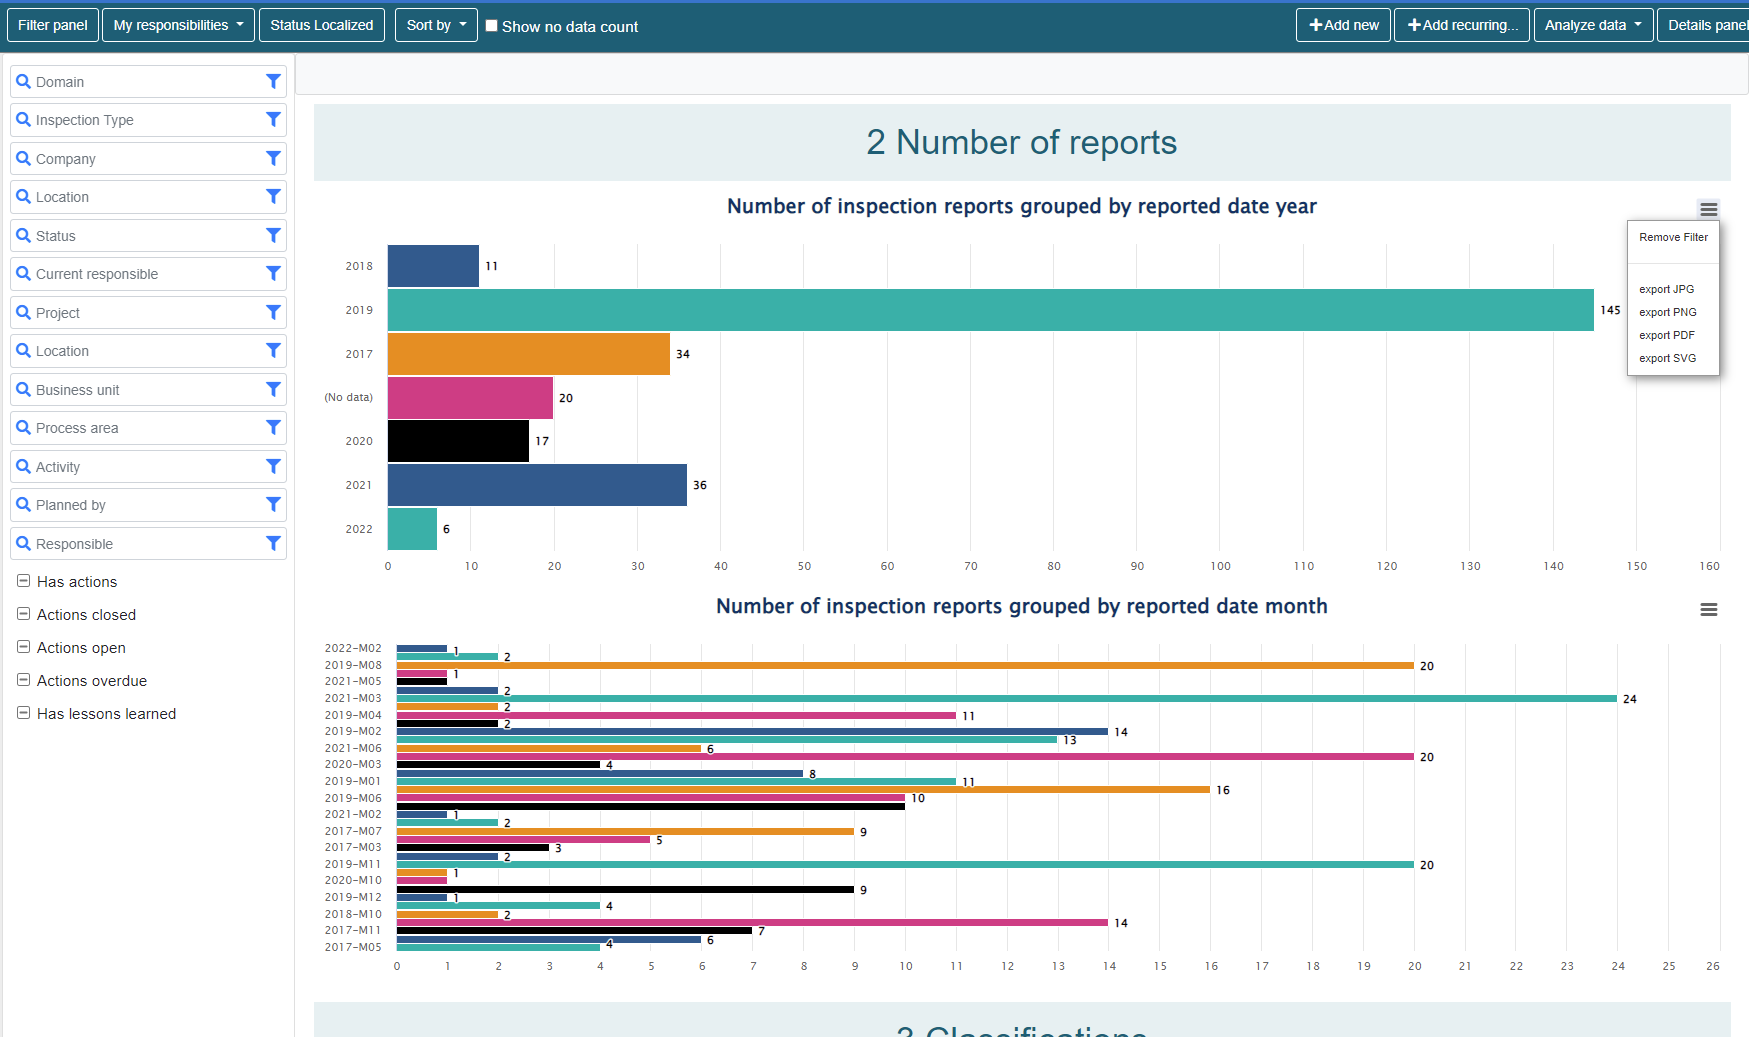
Analyze data
This will present defined graphs and bar charts of the data.
The charts are clickable, so you can click any bar or section to filter the rest of the data on that selection.
Clicking the menu in the top right corner of each chart will give you the option to export the chart, and also to remove any filter that is applied
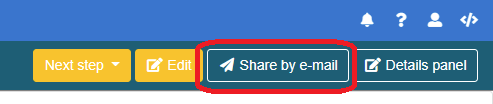
Share by e-mail
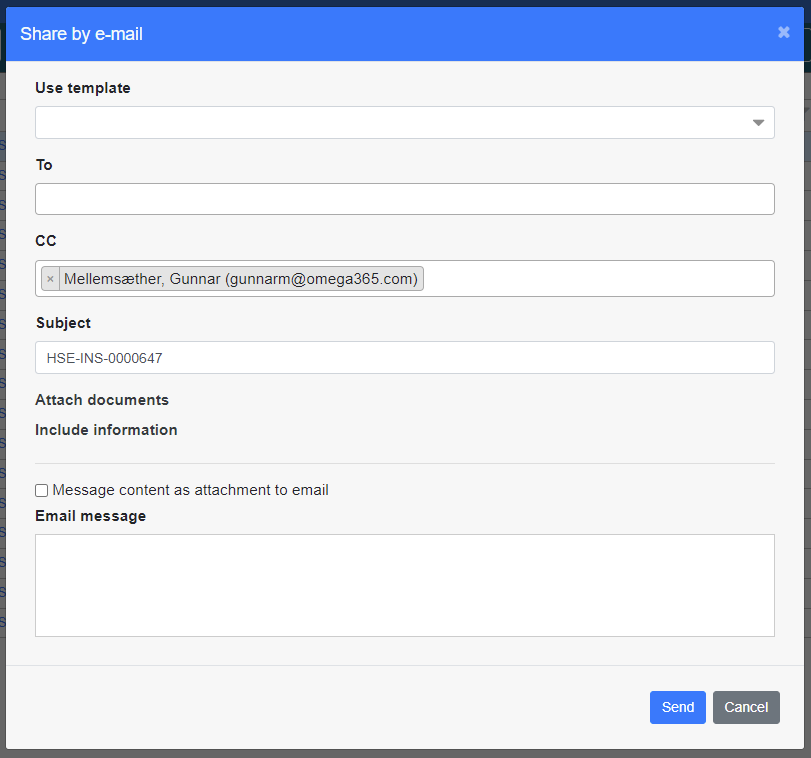
Gives you the option to send an email to anybody. Message sending will be recorded in Pims for reference.
Each module can have their own set of custom made templates that can prepopulate the email contents before sending.
Details panel
When clicking the "Details panel" button a section on the right side of the screen will appear with key information about the record that is currently highlighted in the list.
This is for quick reference without having to open the entire details screen.
Details screens
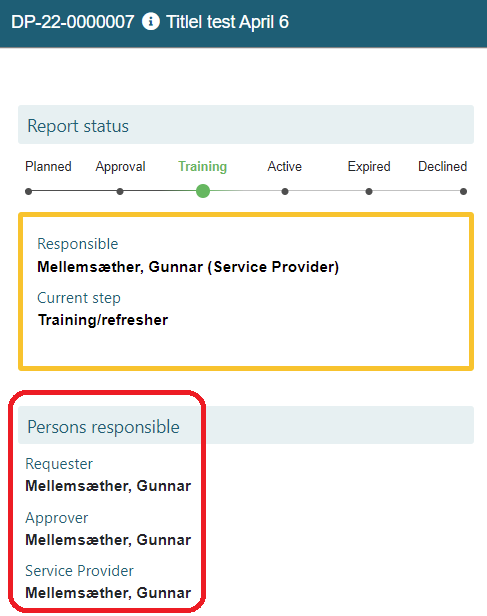
The HSE details screens are divided into two parts. The left part (blue circle) is referred to as meta data, and the right part (red circle) is referred to as details data.
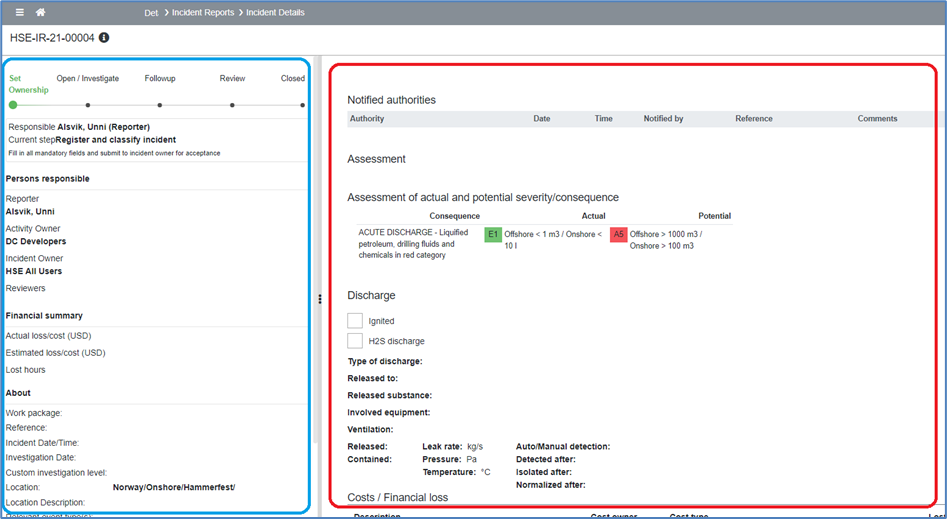
Meta data
Steps
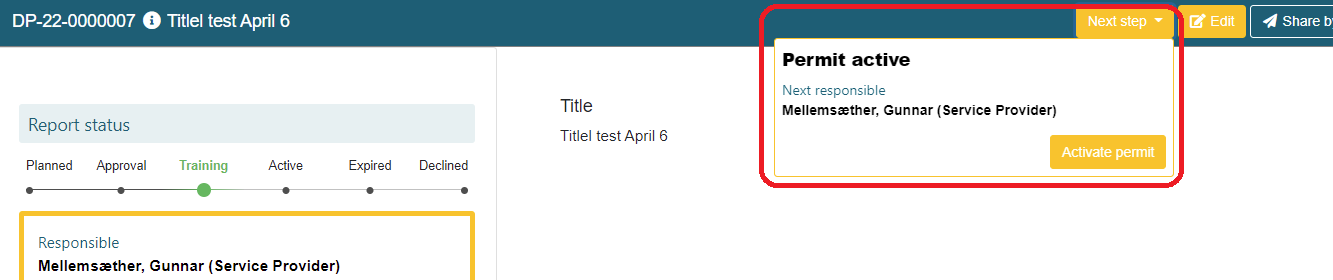
The top section of the meta data will display the steps defined in the module's workflow. The steps a record stands on currently will be displayed in green color.
Below workflow steps you will see a section displaying who is responsible for the record at this step, and also details about the step tasks and procedures. If logged on user is the one currently responsible, this section will be displayed with an orange border:
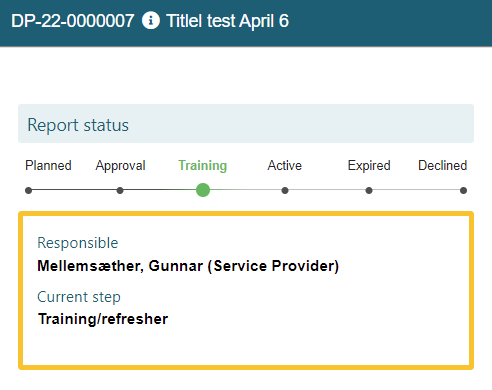
Responsible
Next section displays the persons assigned to roles for this record. These roles can vary based on the workflow implemented. Who can assign persons to each role, and when these persons can be assigned and modified is also part of the workflow setup.
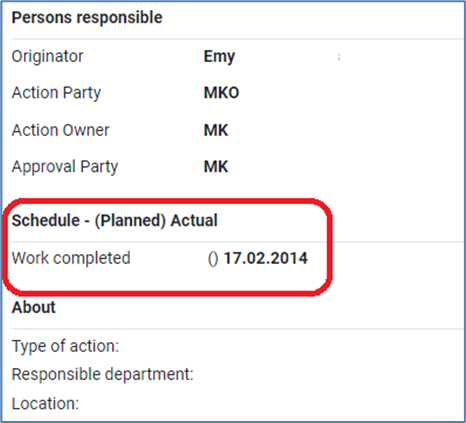
Schedule
Depending on the workflow setup of the module, a section called “Schedule” may appear.
In here you can input target dates, and these will then be auto-populated with actual dates when the workflow reaches that step.
Action items is an example of a module that normally has schedule dates in its workflow.
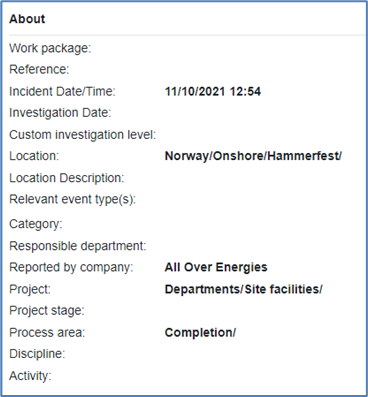
About
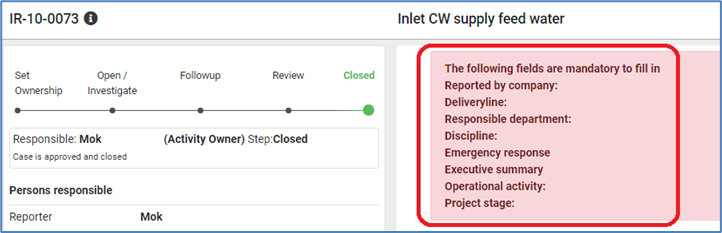
Fields in this section are standardized, but for each installation we can configure which ones should be mandatory, and also if fields should be hidden or read-only.
Details
The details section comes with a standardized set of fields. For each installation we can configure which of these fields should be mandatory, and also hide or write-protect fields.
Editing
Users who have access to edit data on a report will see the “Edit” button in the top right corner. When clicking this button fields will become editable, and mandatory fields will be marked in red color with an asterisk in front.
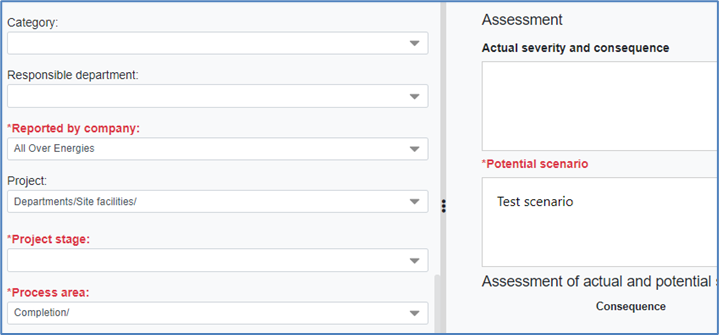
Any missing data on mandatory fields will be visible on the top of the Details section.
Click the “Save” button in the top right corner to save data and exit edit mode
Workflow
If user is responsible person at the current step of the workflow, a button called “Next step” will appear on top of the list. Click this button to see what options are available to progress the workflow from the current step.
Override as superuser
A superuser with the correct privileges will be able to override the current responsible's access privileges and perform that person’s tasks.
Users having that privilege will see a button like this on top of the list

The button will turn orange once clicked, to indicate override is active

Details panel
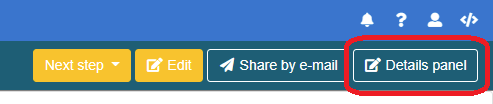
Clicking the button “Detail panel” on top of a list will display a section on the right part of the screen containing any of the below sections (depending on configuration of the module)
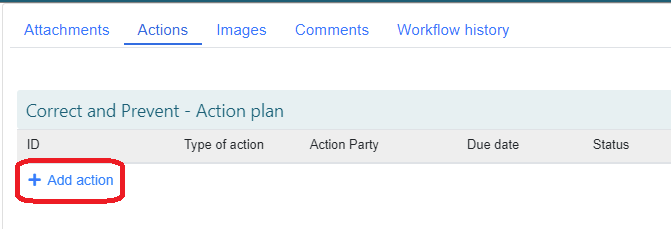
Attachments
Actions
Images (attachments that are images will here be displayed)
Comments
Notifications
Workflow history
Users will here be able to add data to any of these sections, apart from Images and Workflow history, which are auto-populated by the system.
Data can only be added when the Edit button on the record is clicked.
Click “Details panel” again to remove/hide this section.
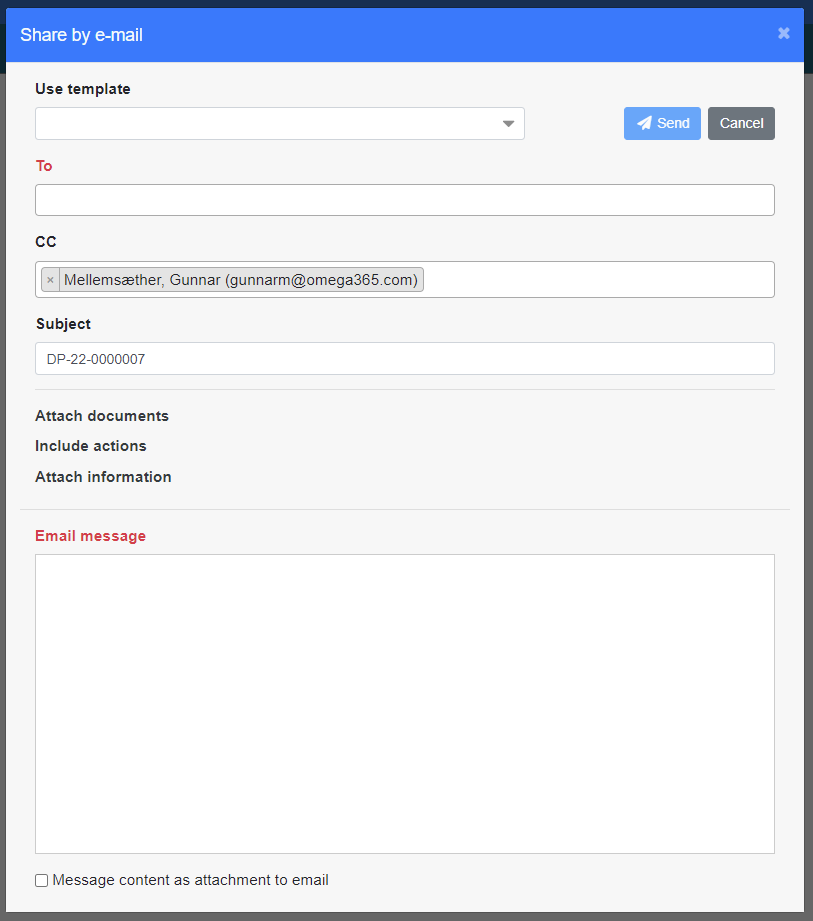
Share by e-mail
Click this button to send an email with information about this report to any recipient of your choice.
This will bring up a window for adding information to the email before sending it.
Roles
For HSE there are 3 predefined roles which can be assigned to individual users. Additional roles can be created on request.
HSE
Standard for all users of HSE. Any user that should have access to Pims HSE must have this role assigned. This will give users the possibility to create new initial reports, and also to view already created reports in the system. These users can also be added to have tasks and responsibilities within specific HSE records.
HSE Team
This is for users who should be responsible for classifying incoming reports, and they will also have the possibility to modify reports inside Pims HSE.
HSE Admin
This is for users who should have access to configure the setup of Pims HSE, like editing contents of lookups. It is recommended to assign this role to a minimum number of users.